WELL-PREPARED, AGGRESSIVE, cohesive, destructive, intelligent and stifling, but with a touch of class too.
Munster provided their most compelling performance of the season so far on Friday night in Kingsholm and though hosts Gloucester were disappointing, the bonus-point victory for Johann van Graan’s side gave us a clear glimpse of his vision for the province.
Click here if you cannot view the clip above
A thrilling task awaits this weekend as Exeter Chiefs visit Thomond Park looking to grab top spot in Pool 2 of the Heineken Cup, but Munster’s showing in Gloucester bodes well – even with the major doubt surrounding captain Peter O’Mahony.
There are many areas Munster will target improvement – a penalty count of 12-9 against them was a concern – but in this piece, we examine some of the key moments in their win last weekend and how they reflected what was a superb collective showing.
Destruction
After a fired-up Gerbrandt Grobler beat Mike Haley to Danny Cipriani’s short kick-off and Chris Farrell was penalised for not releasing post-tackle, Munster found themselves defending a six-metre lineout in the second minute of the game.
Needless to say, a score for Gloucester here and we would likely have been talking about a very different game.
But Munster produced a tone-setting turnover, with Tadhg Beirne leading the way.
Click here if you cannot view the clip above
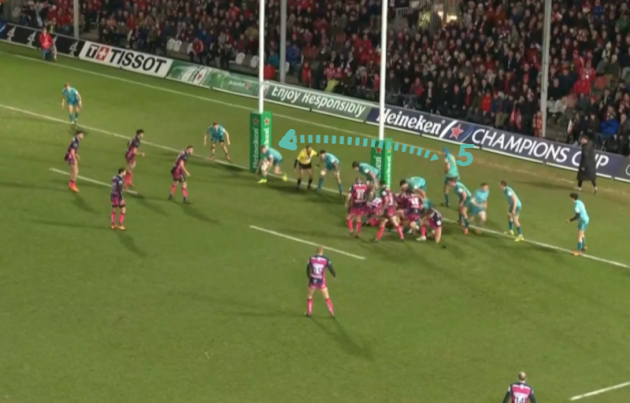
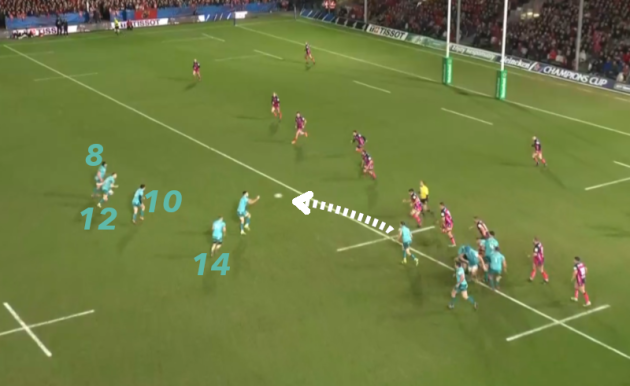
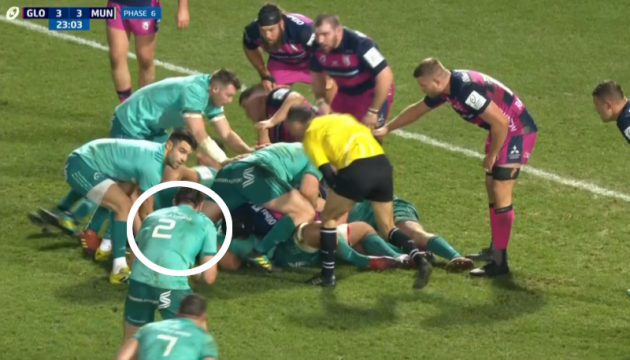
Gloucester set up with a 6+1 formation, meaning six forwards in the lineout and another standing in behind in the ‘receiver’ position.
Franco Mostert begins in the middle of the lineout but he shifts towards the front before the throw [pink below] in an attempt to draw Munster towards defending that area.
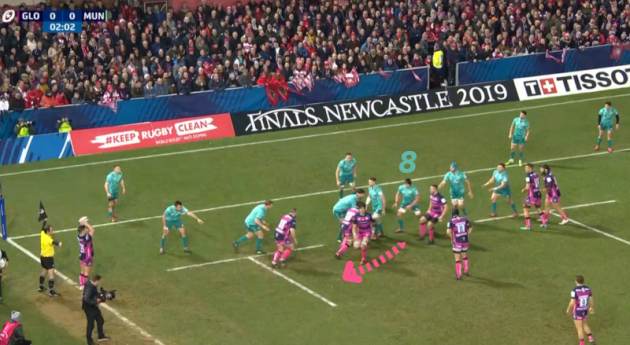
CJ Stander [8 above] is initially drawn forward by Mostert’s movement, thinking he will be needed to lift O’Mahony from behind.
But as Lewis Ludlow swaps places with Mostert, moving backwards in the lineout [white below], Stander makes an excellent read.
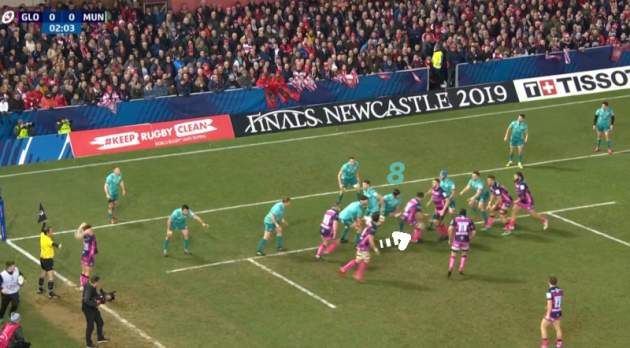
As we can see above, Stander is turning to mimic Ludlow’s movement and it’s a vital reaction from the Munster number eight.
It leaves him in a good position to lift Beirne from the front, with Dave Kilcoyne performing that duty from behind Beirne, meaning the Munster lock is in a strong position to compete with Gloucester’s lineout target, Ed Slater.
As we can see below, Stander and Kilcoyne have carried out a dynamic lift on Beirne, allowing him to get his left hand in onto the ball as Slater attempts to gather it.
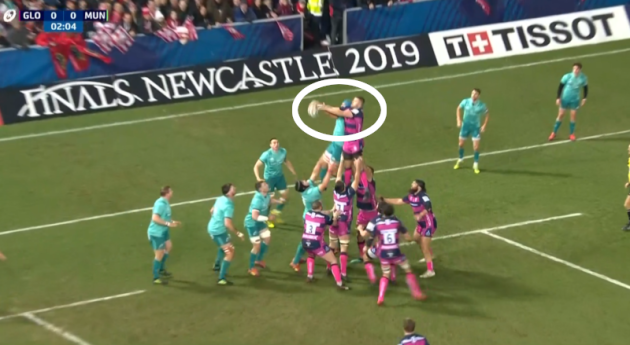
The lineout throw from Henry Walker is slightly too low, playing to Beirne’s advantage but his accuracy in targetting the ball is laudable.
It’s easy to make contact with the opposition jumper’s arms in these cases, or make too much contact with the upper body, thereby giving up a penalty but Beirne is accurate.
He also possesses an uncanny knack for being able to keep his hands on the ball even in demanding positions – whether at lineout or breakdown – and he does as much here, wrapping his left hand onto the ball even as he and Slater come to ground.

With Beirne maintaining contact with the ball, he leaves himself in a good position to fight through and spoil any possible Gloucester maul, but he also benefits from the excellent work of his team-mates around him.
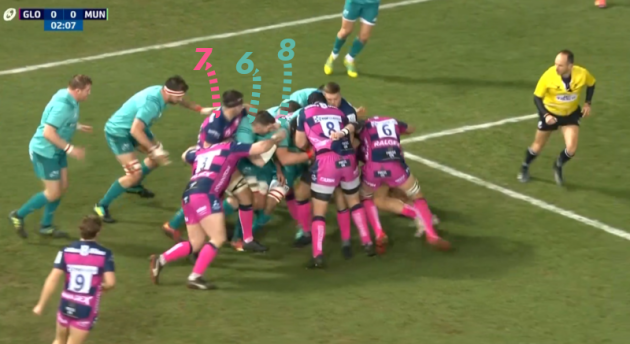
Having lifted Slater, Ludlow’s [7 below] next job is to be solid in ‘bracing’ against Munster’s counter-drive, closing up the seam between himself and Slater and not allowing Munster to burst into that space.

But with Beirne’s hand in on the ball, there is an opening between Ludlow and Slater, one that O’Mahony [6 above] and Stander [8] identify with aggressive glee.
In the image above, O’Mahony is beginning to latch onto Stander as they surge into the space between Ludlow and Slater, keen on following Beirne through to break that seam apart.
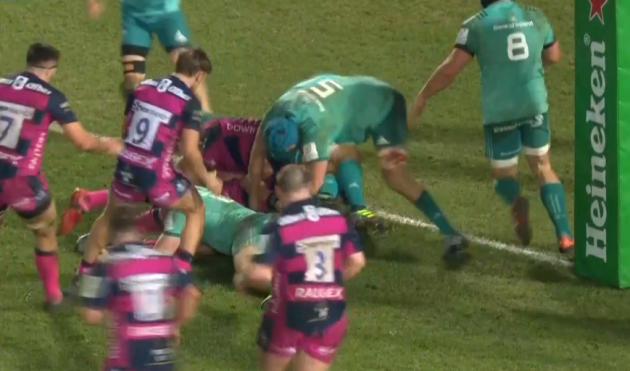
As we can see below, they’re successful in following the gritty Beirne into that space and Stander even gets his hands around the ball alongside his second row.
Jean Kleyn floods in behind O’Mahony and Stander, while Kilcoyne and Tommy O’Donnell hammer the maul from the other side, while Beirne fights to cling onto the ball.
With Gloucester in retreat as the contest goes to ground, referee Romain Poite has a simple and clear decision in awarding Munster a scrum.
This lineout turnover was a prime example of the dominance Munster enjoyed in this area of the game, while they also edged a scrappy scrum battle – winning three penalties and two free-kicks to Gloucester’s three penalties.
While Munster lost two of their own throws, they wreaked havoc on the Gloucester lineout, turning the ball over on five other occasions as well as defending the maul strongly.
Certainly, the signs were of a team that was superbly prepared for this game.
“All credit to Jerry [Flannery] and the forwards, we worked so hard on it,” said a pleased van Graan post-match.
Utter resilience
It’s rare that a coach looks back on a conceded try as a positive, but Munster’s defence before Ollie Thorley scored on 35th phase early in the second half was remarkable.
“Even though they scored the try that actually made us stronger in terms of our belief,” said van Graan.
The defensive passage followed a poor start to the second half when Carbery’s restart didn’t go 10 metres and Munster conceded four penalties in six minutes to give Gloucester repeated chances inside their 22.
But the manner in which van Graan’s team fronted up and made Gloucester work for their score – just after losing captain O’Mahony to injury – spoke volumes of the Munster mindset on a night in which their defence was generally excellent.
This passage lasted five minutes and 20 seconds from lineout throw to the try being scored – a truly rare length of ball-in-play time that pushed the players’ fitness to the very limit.
The repeat efforts from Munster’s forwards, in particular, were exemplary. Below, we can see the number of involvements in tackles by each player.
12 Billy Holland
11 Stephen Archer
10 Tadhg Beirne, CJ Stander
9 Jean Kleyn
8 Tommy O’Donnell, Niall Scannell
6 Dave Kilcoyne
4 Conor Murray, Chris Farrell
3 Rory Scannell
2 Andrew Conway
1 Keith Earls
These aren’t all direct one-on-one tackles, obviously, but when a defence is close to the tryline, tackle assists are crucial – players hammering into an already formed tackle to deny the attacking team gains of inches.
The defensive passage began with some determined maul defence from Munster, with Niall Scannell, Keith Earls, Kilcoyne and O’Donnell effective in denying Gloucester’s two attempts to shift their drive off to the right.
From there, Gloucester begin to pick and jam, meaning Munster are soon defending their tryline for their lives. Each defensive phase is a highlight in its own right, but we’ve done our best to pick out a handful of examples that illustrate the fight.
Click here if you cannot view the clip above
Ben Morgan makes a surge for the line on 10th phase in the clip above, but he’s working on his own, whereas Munster defend in a pair through Stephen Archer and Rory Scannell.
Archer’s starting body position is low, allowing him to hit Morgan’s legs, while Scannell goes high up around the ball. The combination stops Morgan dead in his tracks.
On the next phase, Munster really should be awarded a turnover penalty as Beirne swoops.
Click here if you cannot view the clip above
In typical fashion, Beirne sweeps in behind the defensive line – working behind the posts…
… and leaving himself in prime position to jackal after Chris Farrell and Billy Holland combine to stop Slater from crossing the line.
Beirne wins the race to the tackle and gets his hands on the ball while still on his feet. Even as Gloucester arrive in an attempt to clear him out, Beirne clings on and Munster justifiably appeal for the turnover.
However, Poite – who has come around behind the ruck and therefore doesn’t have clear sight of Beirne on the ball – says, “Hands out, now!”
It’s frustrating for Munster but Beirne’s discipline in releasing the ball underlines the discipline of this entire passage. Not conceding a penalty was exceptional.
Gloucester return to their pick-and-jam tactics but Munster continue to deny them.
Click here if you cannot view the clip above
The base of the post is a danger in the instance above and Morgan is clearly targeting it with his carry, but O’Donnell and Archer combine superbly to stop him.
Archer’s hand is in front of the tryline before the phase begins, so technically it’s an infringement, but the work rate continues to shine through.
Stander makes an incredible hit on the upright Grobler in the case below, with Holland and O’Donnell piling in.
Click here if you cannot view the clip above
Stander actually strips Grobler in the tackle here, coming away with the ball.

But again, Poite is behind the ruck and unsighted.
The ruck closes in over Stander and he can’t get the ball back to Munster’s side, meaning Gloucester continue their attack.
The English side very nearly score on 20th phase, only for Earls to make a sublime covering tackle.
Click here if you cannot view the clip above
Centre Mark Atkinson carries off scrum-half Callum Braley but he’s smashed by Farrell and Conor Murray in the tackle, forcing the ball loose.
That actually plays into Gloucester’s favour as Braley scoops the ball up and sweeps it wide to wing Charlie Sharples in clear space.
It’s a prime try-scoring opportunity for a finisher like Sharples, who has scored nine tries in the Premiership this season.
He will have some regret about missing this chance and will perhaps reflect that he might have been better served by looking to step back to the inside of the sprinting Earls.
But Earls deserves the bulk of the credit for his effort – as much about mindset as the tackle itself.
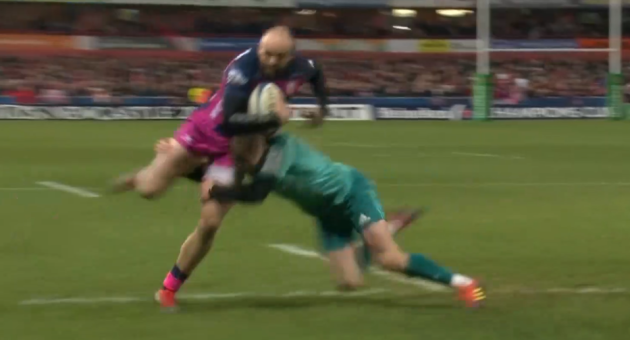
The acceleration across to Sharples is impressive and then Earls commits fully into the hit. His head is technically on the ‘wrong’ side of the tackle, tucked in front of Sharples’ legs, but the determination to do whatever it takes to ground the Gloucester man is clear.
Earls makes an impact with his right shoulder and wraps his arms superbly, finishing around Sharples’ right leg.
A sensational save from Earls, but still Gloucester come at Munster. They’re forced to start again further out but a good offload from Atkinson to Billy Twelvetrees puts them back in behind Munster and thundering at the tryline.

Click here if you cannot view the clip above
With that momentum, Slater looks odds-on to score above but Beirne, Murray and Stander manage to just prevent him doing so – the desperation clear again.
There are several more tryline efforts from Munster, including a huge hit by Archer and O’Donnell on Grobler just before the scoring phase, but eventually the crack appears and Munster concede.
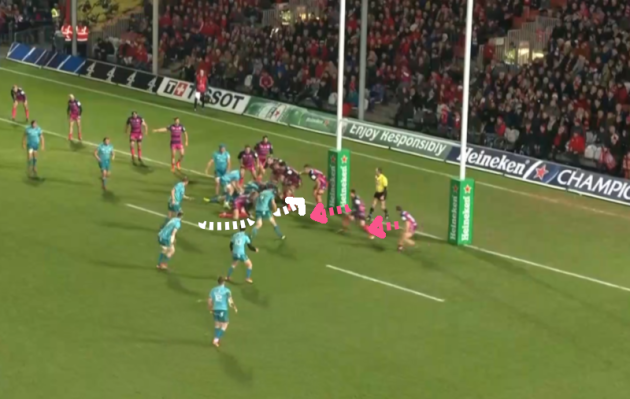
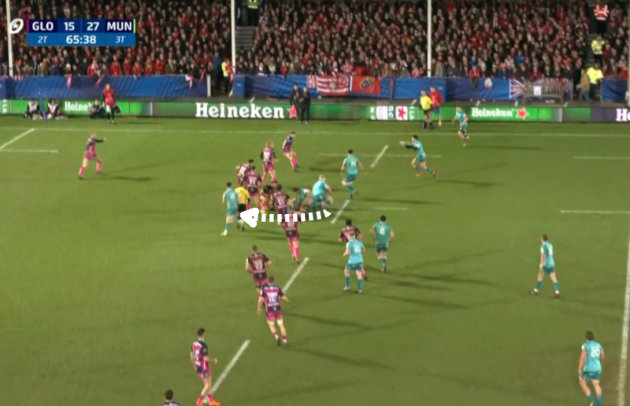
Below, we can see how Munster are set up just before Gloucester move the ball wide left to Thorley.
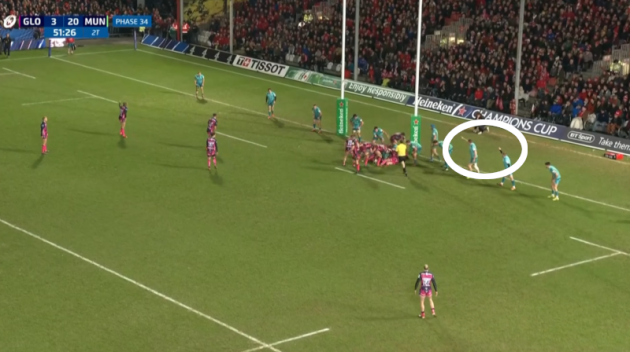
Farrell and Earls [circled in white] are indicating and shouting for the players closer in to the ruck to fold across to the other side and number-up there.
As things stand, Munster have seven players on the right of the ruck [Haley is off screen] against only one Gloucester attacker in Sharples.
Munster, fatigued to exhaustion point, can’t react to get numbers across to where the rest of the Gloucester backline is set up and the Premiership outfit take their chance via some fine handling by Atkinson and Cipriani.
Even at that, Munster force Thorley to score out wide and Twelvetrees is wide with the conversion. Munster’s belief, even after conceding, only grows.
Overall, it was a superb night for JP Ferreira’s defence as they frustrated Cipriani and Gloucester.
A turnover penalty from Beirne at the breakdown provided Carbery with a shot at goal for a 13-3 lead in the first half and there were other turnovers, as well as Carbery’s intercept try – another big highlight for the Munster defence.
Ball-carrying and Carbery class
Munster’s ball-carrying in this game was excellent, with van Graan saying he thought his team “dominated the collisions.”
There were excellent carries in the build-up to several of the Munster tries, including Carbery’s first in the opening half.
The passage begins with some smart play from Munster to put Stander into a one-on-one ball-carrying position to give them early momentum.

From the right-hand side, Munster use a 5+1 lineout, with O’Donnell [7 above] in the receiver position and scrum-half Murray [9, circled] just beyond the 15-metre lineout.
It’s a set-up Munster have used frequently in recent times and even used again later in this game in the build-up to Andrew Conway’s try.
Munster initially look set to maul, but O’Donnell instead takes the transfer from lineout jumper Beirne and passes to Murray, who has drifted away from the 15-metre line.
Importantly, it’s an excellent pass from O’Donnell and allows Munster to put their plan into action.
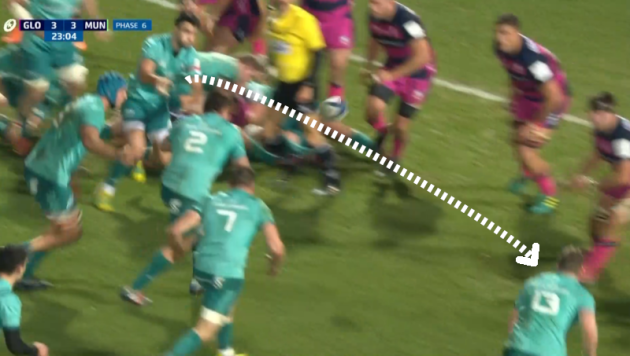
As we can see above, Murray has plenty of potential receivers around him, with Conway [14] running an inside support line, while Carbery [10], Rory Scannell [12], and Stander [8] are all available outside.
Those players are all vital in holding defenders to allow Stander to get one-on-one with Atkinson.
Murray himself is attracting Morgan [as illustrated in turquoise below], while Conway on the inside occupies Ludlow [white], the tailgunner from the lineout.
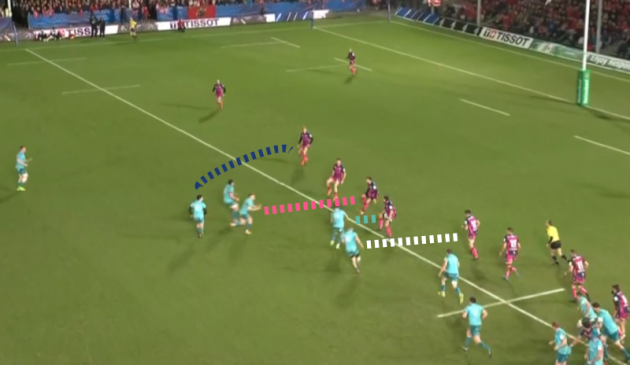
Meanwhile, Scannell is sitting down Cipriani [pink] with his run – showing good ‘animation’ with his hands up.
Carbery is arcing out the back of Scannell and Stander, worrying Twelvetrees [blue].
Of course, that leaves us with Stander going up against Atkinson. The result is resoundingly to Munster’s advantage.
Click here if you cannot view the clip above
Atkinson is high into the tackle on Stander and Munster’s number eight explodes into the contact, trampling over the Gloucester centre on his way through to provide the perfect platform for the resulting attack.
Farrell makes a strong carry and then Murray snipes left, before Kilcoyne and Stander pick and jam in the same direction. Munster reverse to their right and Stander is back on his feet offering himself for a third carry in 30 seconds of play.
Click here if you cannot view the clip above
Stander’s refusal to go to ground is important here, but the work of Kilcoyne and Kleyn in latching onto him after the initial contact is the key.
The final carry before the try comes from Farrell and is similar to his first.
As Murray sets up to pass the ball, the obvious target is hooker Niall Scannell [circled below].
Scannell has O’Donnell on his outside and Beirne [out of shot here] arriving to his inside to form a recognisable ball-carrying pod of three forwards.
It’s the obvious target for the defence, but Murray instead zips the ball in front of Scannell and wider to Farrell arriving on a slightly ‘blind’ line back in across the eyeline of the defence.
It means the defenders in front of him have to adjust at a late stage and it also means Farrell is moving at real pace onto the ball.
With his size and power making him such a threat, we can see below that Gloucester have to commit three defenders into the tackle.
Click here if you cannot view the clip above
Farrell’s good carry leaves Munster in position to strike for the score and they take their chance clinically – as they did all evening in Kingsholm.
There’s a crucial run from the hard-working Kleyn to open the gap for Carbery on the next phase, with the Munster lock coming around the corner to interest the Gloucester defence.
As we can see above, Kleyn’s run [in white] lures in Cipriani, with Braley outside him reacting by also biting in [both in pink].
That leaves space outside Braley and Murray’s pass selection and execution are perfect.
Click here if you cannot view the clip above
Carbery is the finisher in this instance but he was, of course, the creator later in the game for Conway’s superb try.
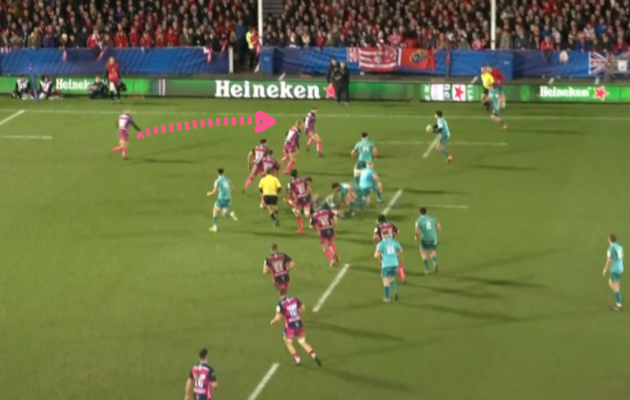
Coming from a left-hand side lineout and using the same initial set-up as above, Munster carry through Arno Botha, Niall Scannell and Beirne across to the right-hand side 15-metre line.
They look set to bounce back to their left, with Scannell and John Ryan [white below] in position to carry.

However, Holland [blue] and Carbery [turqouise] are already in motion, moving across to the shortside on what appears to be a pre-planned attack all stemming from the initial lineout on the left.
Murray intelligently sells a pass to his left before dropping the ball in behind to Holland, then taking off upfield [white below].
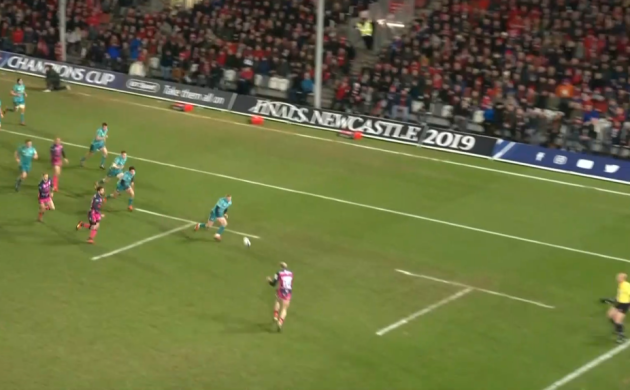
Murray is hopeful of linking up with a Munster linebreak but he won’t be needed as Carbery’s kicking class comes to the fore.
Holland provides a simple pass to his out-half and then Carbery assesses his options on the move. Making decisions while on the move is a difficult task but it’s something that Carbery excels at.
In the first half of this game, he did as much to place a superb right-footed grubber behind Gloucester and very nearly provide Conway with a try.
On this occasion, Carbery can see Gloucester fullback Tom Hudson moving up to ‘close the gate’ on the edge of his team’s defensive line [pink below].
It’s an error from Hudson, as Gloucester have enough defenders up in the defensive front line to deal Holland, Carbery and Conway.
Carbery identifies the opportunity and, in a split second, realises that his left foot provides a greater opportunity of getting the ball into the space Hudson is vacating, just as Twelvetrees closes in to tackle Carbery.
Having used his right foot in the first half, Carbery now uses his ‘bad’ left foot to tee up Conway beautifully.
Click here if you cannot view the clip above
The technique from Carbery is a delight as he strokes the inside of his left foot through the top of the ball, resulting in the ball rolling end over end and sitting up ideally for Conway to gather.
The truth is that Carbery has never seen his left foot as his ‘bad’ foot.
“When we were practising when I was younger, my dad always pushed me to kick two off my left and one off my right, every time,” Carbery told The42 in an interview last year.
“Two kicks off the left for every one off the right.
“From playing fullback, I know that playing against a 10 who can kick off both feet is a nightmare, especially when he can do it well. I’m always trying to work on it and the better it gets, the easier my job will be.”
For Carbery, practice makes perfect.
And for Munster on Friday night, it was a similar story.
Subscribe to our new podcast, Heineken Rugby Weekly on The42, here:
