SOUTH AFRICA AND New Zealand served up a classic at Ellis Park on Saturday, with a breathlessly high-paced, intimidatingly physical and exceptionally skillful encounter underlining the challenge the Northern Hemisphere sides will face at the World Cup.
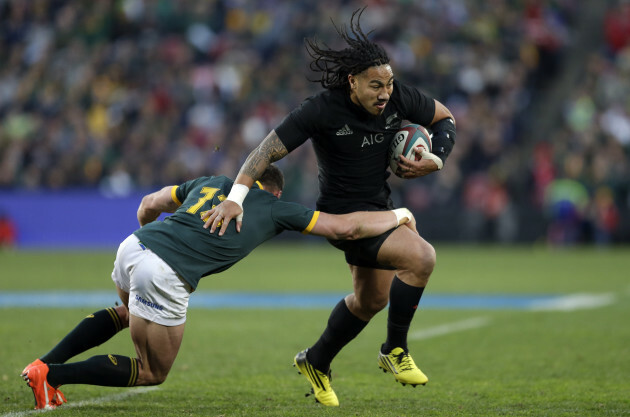
While conditions in England and Wales in September and October are likely to be very different to those in Johannesburg over the weekend, the sheer quality of this Rugby Championship tie was eye-opening.
New Zealand and South Africa are on course for a semi-final collision at the global tournament and on this evidence it would be extremely surprising if that mouthwatering fixture doesn’t happen at Twickenham in late October.
This game threw up a whole range of intriguing talking points, but in this piece we’re going to begin by analysing the two first-half tries, which were remarkably similar and underlined some of the key trends we’re likely to see at the World Cup.
Turnover ball
Turnover possession is a prime opportunity for scoring tries, something underlined by South Africa and New Zealand in the first half at Ellis Park. A high percentage of the tries scored in top-level rugby originate from turnovers, and it’s fairly obvious why.
A swift turnover of possession leaves the defensive side vulnerable, with their players not in ideal shape, forwards caught in exposed positions and very often a numeric disadvantage in a certain area of the pitch, usually some distance from the turnover.
It’s quite difficult to transition from attack to defence successfully, all the more so against teams like New Zealand and South Africa, who are lightning quick at pouncing on turnover chances.
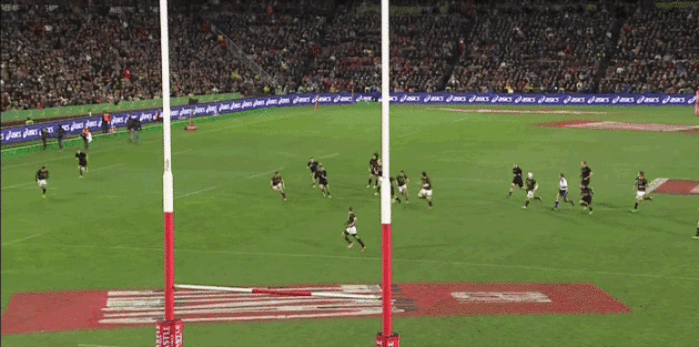
We got a perfect illustration of that with the first try on Saturday, as Heyneke Meyer’s men turned the ball over and struck with stunning speed, giving the Kiwis a taste of what is so often their own clinical medicine.
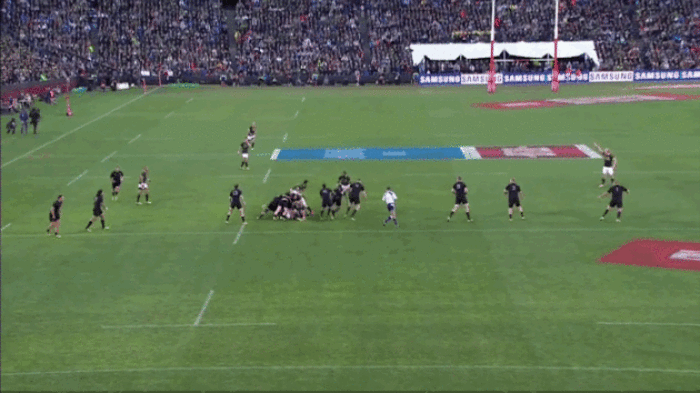
The turnover situation comes from a high Ruan Pienaar kick, and the real key is a determined chase from his teammates, part of their almost-successful plan to suffocate the New Zealanders at every opportunity.
As we’ve seen with Ireland over the last two seasons, a strong chase is pivotal to a successful kicking game, perhaps even more so than the quality of the kick itself at times.
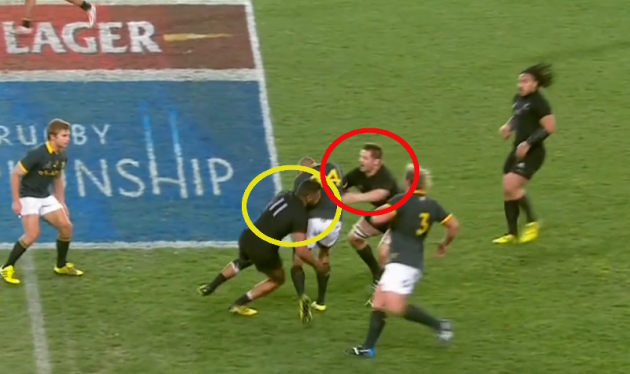
In this case, right wing Cornal Hendricks leads the charge (red arrow), after Pienaar has confirmed he’s in a strong position to chase the kick – one which has a generous four seconds of hang time on it.
The South Africa pack is also onto the scent in rabid fashion, with Bismarck du Plessis and his brother Jannie (yellow arrows) forging ahead even before Hendricks has put them onside.
Already the chance to pressurise the Kiwis into an error is foremost in their minds, this coming a week after Meyer’s side had failed to do so to the Wallabies in a weak kick and chase performance.
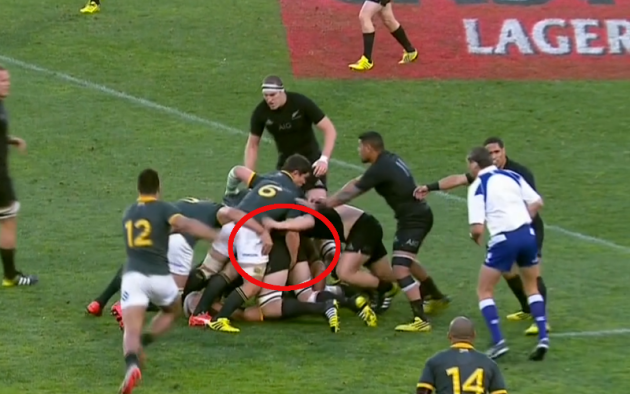
The effect of the pressure is obvious as Dagg throws a misjudged pass inside to the exposed Kieran Read, who is taken ball-and-all by Bismarck du Plessis, instantly opening up a turnover opportunity.
Du Plessis never regains his feet as he competes, and there is certainly some hint that he plays the ball illegally. Indeed, the Kiwis seemed unhappy about it and scrum-half Aaron Smith did shout ‘Sir, he’s got to roll away!’ at referee Jérôme Garcès.
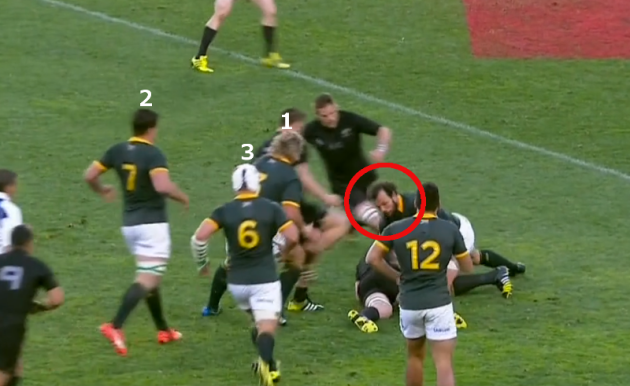
Nonetheless, it’s the weight of numbers arriving for the Boks that seals the turnover, as Richie McCaw initially has to deal with three rucking players piling in. While Jannie du Plessis and Francois Louw do superb work, we have to highlight Heinrich Brüssow in particular.
Brüssow, who was superb on his return from international exile, actually picks Read up off the ground, as highlighted above.
He’s obviously intent on clearing the body out of the way for the turnover, but this intelligent piece of lifting means du Plessis can present the ball cleanly on the South African side of the ruck, shaving a couple more crucial seconds off the speed of the ball.
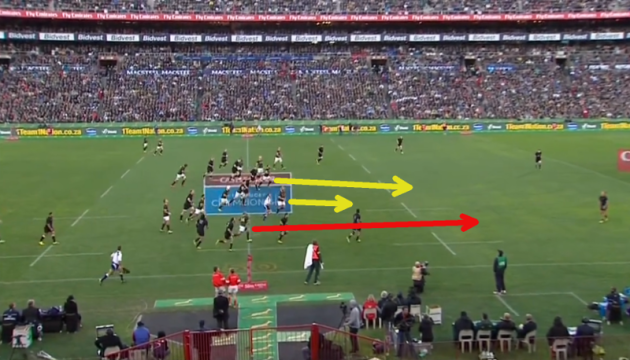
From here, the try is begging to be scored and the South African players who have swiftly set themselves up to the left of the ruck are fully aware. Below, we see captain Schalk Burger and then centre Jesse Kriel communicating where the space is.
That communication is important, but the entire South Africa team is on the same wavelength here: shift the ball. Many teams operate with specific two-pass or three-pass rules post-turnover, but the general premise is that the space will be on the other side of the pitch.
Sticking to that too slavishly can of course lead to missed opportunities elsewhere on turnovers, but the space on this occasion is most certainly wide to the left.
Damien de Allende gets the ball moving with a loopy pass to Burger, who then flings a superb long pass to Kriel. The 21-year-old centre has deservedly picked up much credit for his assist on this score, but we’re more interested in try scorer Wille le Roux.
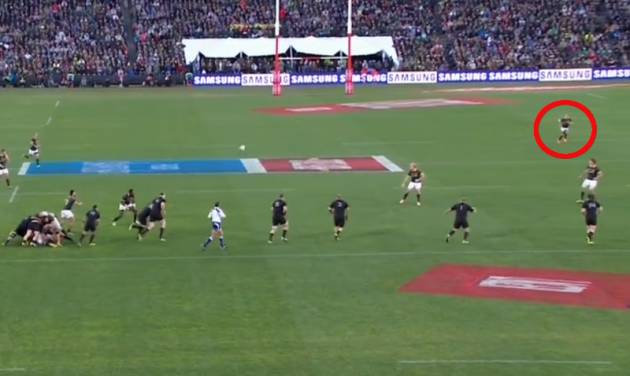
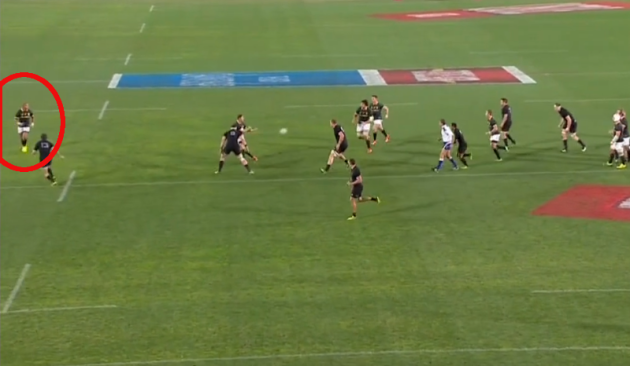
With the ball heading towards Burger in the image above, we’ve highlighted le Roux’s starting position. He’s deep behind his team, covering any potential return kick from New Zealand had they not been turned over after Dagg’s pass.
Spotting that turnover, le Roux switches his focus in an instant, bursting to get up into the attacking line and ensure an overload.
A player of searing vision, he’s scanning the defence while he makes his way into the line, searching for the mismatch he can expose.
One of those dangers of turning the ball over we mentioned above is having tight five forwards in exposed positions on the field, where their relative lack of pace, agility and reaction times are so often taken advantage of.
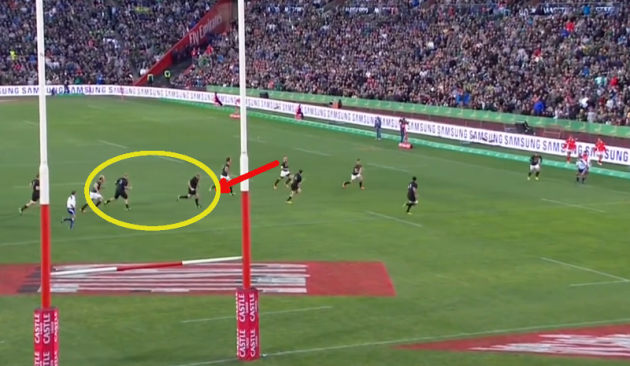
This is a prime example, as New Zealand props Owen Franks and Tony Woodcock find themselves as midfield defenders attempting to drift hard across the pitch.
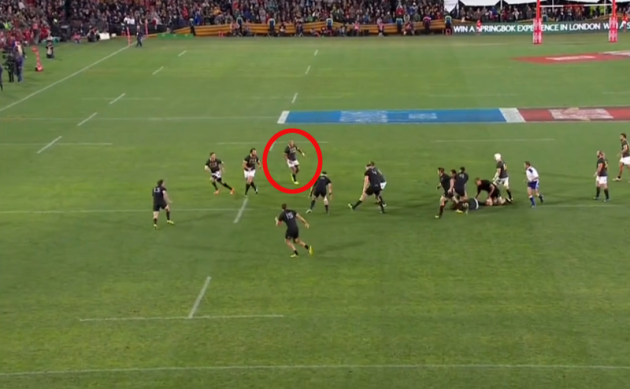
Above, we can see le Roux identifying exactly that as he moves up. There might have been temptation to join outside Kriel to accentuate the original overlap, but aware that Ben Smith will get to Kriel and that Liam Messam is working to cover Bryan Habana wide on the left, le Roux makes up his mind.
We get another angle of le Roux picking out the fatties in the New Zealand defence above, in particular Woodcock, before he gives a short burst of communication to let Kriel know that he wants the pass inside.
Kriel does a superb job of straightening slightly and not taking too much out of it before hitting le Roux. It’s tempting to hang onto the pill a little longer here, perhaps drawing Smith further into a tackle, but he trusts le Roux’s chat and hits him with the pass.
It takes just 20 seconds from the moment Pienaar kicks the ball, but this score highlights the importance of a hungry kick chase, ferocious breakdown competition, forwards being able to pass and players scanning for mismatches on turnover ball. Clinical stuff.
Respond in kind
Perhaps the most impressive facet of the Kiwis’ performance in this game, even without the likes of probable World Cup starters Dan Carter, Jerome Kaino and Julian Savea, was their mental calm.
The Boks battered them at times, smothered their attack with huge linespeed and manic aggression at ruck time, and owned the territory and possession for large chunks of the game, but Steve Hansen’s men remained in control of their emotions.
They struck effectively when rare scoring opportunities were earned and consistently believed in their ability to do so. Many other sides might have been ‘rattled’ by the South African performance, but the Kiwis were as patient and confident as ever.
Anything the South Africans can do, the Kiwis can do better.
Their try on the stroke of half time, a desperately difficult pill for Meyer’s side to swallow, was remarkably similar to the one scored by le Roux, right down to the possession platform being a turnover directly from a contestable kick.
The kick itself is once again superb, with the brilliant Smith managing to hang it in the sky for over four seconds. That allows future Ulster man Charles Piutau to lead the chase up, with Richie McCaw also arriving on scene to smother the receiving Hendricks.
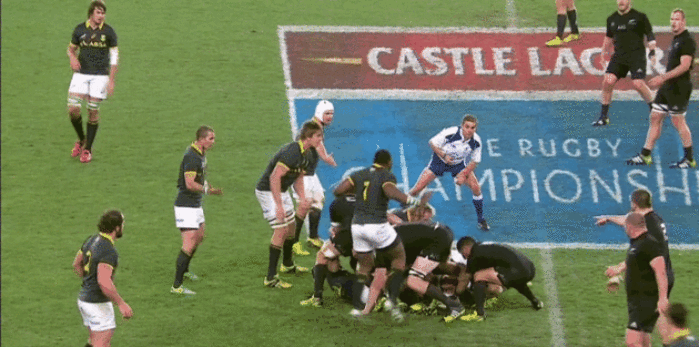
As the contest goes to ground, Messam and Brodie Retallick both pile into the tackle zone and, as for the Boks’ try, the turnover is complete in an incredibly short time.
If the South Africans showed they can use turnover ball in a clinical manner, then this situation is one that the Kiwis live for. Again, the immediate instinct and systematic action is to shift the ball swiftly in order to find and exploit the space.
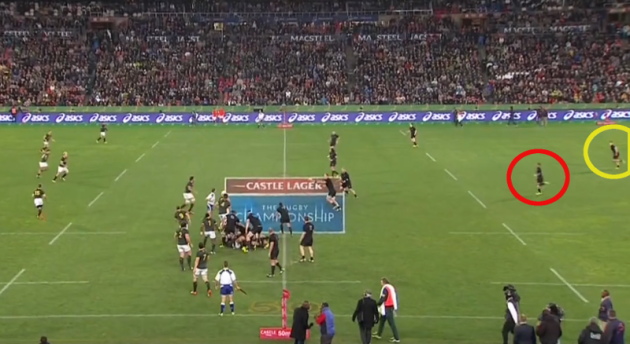
Below, we’ve highlighted key man Lima Sopoaga in red, while Dagg is marked with the yellow circle. As with le Roux coming from deep for the South African try, Sopoaga’s swift entry into the attacking line from that deep position is essential in ensuring an overload.
The Kiwis’ first goal is to move the ball away from the tackle point and that mass of bodies that is so evident in the image above. Clearly, the depth at which the South African defence lies further out the line presents an opportunity.
It’s worth making time to mention the pass from James Broadhurst that gets the ball into Ma’a Nonu’s hands here, echoing the skill level of Burger in finding Kriel.
We’ve spoken about the skill levels of New Zealand’s tight forwards only recently on The42, and while this is again a simple spin pass with time and space, it’s still a vital contribution.
Any team intent on being clinical with turnover ball simply must have forwards capable of putting the ball into space accurately, as well as having the awareness to realise where the space is. Had Broadhurst opted for a carry here, the chance would have quickly shrivelled away.
Instead, it’s moved on for a second pass and suddenly the combination of that ball movement and the arrival of Sopoaga into the line results in a linebreak.
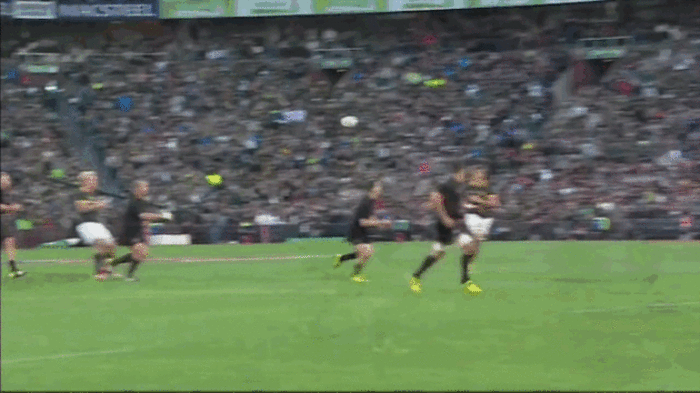
Woodcock was the man exposed for le Roux’s try and it’s a tight five forward again on this occasion, as 120kg lock Lood de Jager finds himself in major trouble. With Burger focusing on dealing with Nonu, de Jager is left with huge ground to make up on the drift.
Sopoaga is fully aware that it’s de Jager attempting to cover and runs that inside line, similarly to le Roux. Nonu does the same unfussy job as Kriel, slightly straightening and then slipping the pass to Sopoaga, who is patient enough not to fall into the error of overrunning the ball.
From there, Sopoaga’s pace takes him clear of the loping de Jager, drawing fullback le Roux and left wing Habana in towards the ball. It still takes an exceptional basketball-style pass from Sopoaga to seal the deal, though this kind of skill is almost uniform across their squad too.
It was a telling blow for the South Africans to concede this score just before the break, but few were surprised to see the Kiwis do it.
While South Africa did show their own clinical edge for that le Roux try we’ve looked at above, it’s worth rewinding the match clock to 39.00 to take another look at why the New Zealanders had the initial lineout from which Smith launched his booming box kick.
Indeed, the moment below underlines one insight we garnered from this game: despite the le Roux score, the South Africans remain a slight distance behind New Zealand in terms of being ruthlessly clinical.
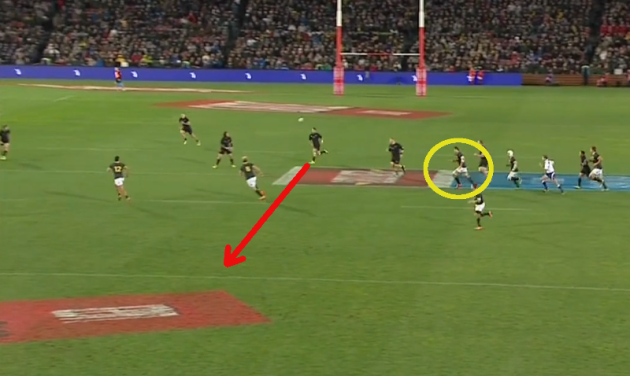
Many will remember the incident above from Saturday’s game, when an inaccurate pass from le Roux was criticised as integral to an extremely promising move breaking down. Of more interest to us is the movement of right wing Hendricks.
Following a typically powerful run by de Allende, Hendricks is in position outside le Roux on the second phase in the video above.
But move play forward another phase – with hooker du Plessis having worked extremely hard to get around the corner and create what would have been a notable overlap – and Hendricks is almost standing still in a poor position.
He’s decided to move inside le Roux for some reason, meaning that when the fullback looks for that offload, there’s no short pop option. Hendricks could and probably should have been there to accept the ball.
The intention here is not to heap the blame on Hendricks of course, particularly as there were several other scoring opportunities that were left behind the South Africans.
The more general point is that New Zealand, who were not at their best in an overall sense on Saturday, would almost certainly have taken more of the opportunities that Meyer’s men missed.
Indeed, 50 seconds after le Roux’s offload dribbled harmlessly into touch, Ben Smith was touching down to the right of the South African posts to turn a possible 10-3 half-time deficit for New Zealand into a much more pleasing 10-10 scoreline.
We’ll be looking at the other three tries from this game in a separate piece on The42.
