FOLLOWING ON FROM yesterday’s piece on the remarkably similar counter-attacking scores by South Africa and New Zealand in their riveting Rugby Championship clash, we look at the other three tries from the game in this article.
As with their opening tries on turnover ball, the Kiwis and Springboks scored kindred second tries. Both featured superb lines by the try-scorer to pierce the defence and both originated at the set-piece.
The tries occurred within four minutes of each other in this absorbing game.
Kriel cuts the veterans
Stung by their concession of the Ben Smith try on the stroke of half time, the Boks came out from the break with renewed energy, beginning the second half as strongly as they had the first. Their efforts culminated in Jesse Kriel’s wonderful 46th-minute try.
Whereas the possession platform for the first-half tries were turnovers directly from kick chase, the next two scores originated at the set-piece. For Kriel’s effort, the Boks threw to Warren Whiteley at the tail and used a clever mini-peel move after transferring the ball to lock Lood de Jager.
It’s a play we saw the Boks very nearly score with in this same game, only for a brilliant tackle from Richie McCaw just metres from the New Zealand tryline to deny Heyneke Meyer’s side.
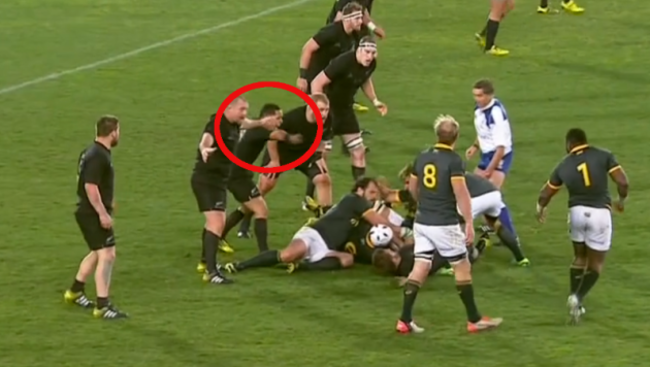
Above, we see South Africa’s use of the play as they kick-start the attack leading to Kriel’s try, although it’s not as slick a movement as we saw later in the game.
Kieran Read does a superb job in this instance, wrestling his way onto the ball and felling Tendai Mtawarira. We can see scrum-half Ruan Pienaar appealing to referee Jérôme Garcès, but the fact that the Boks themselves have broken off the original maul sees Garcès allow it.
It’s worth looking at the Boks’ second use of this play, particularly as every other World Cup team will have been keeping a close eye on their maul play.
There are legality question marks over the South African’s actions here, as Eben Etzebeth and Heinrich Brüssow pre-bind onto de Jager before there is any contact from a New Zealand defender.
Some might point to this as an example of the ‘Flying Wedge,’ which is explained in World Rugby’s lawbook as follows:
As pointed out by the excellent Blitz Defence, there is some confusion around the issue of pre-binding to the ball carrier, although the common use of the ‘leech’ or ‘latch’ in attack has made referees more than comfortable with it.
Brüssow does appear to bind to de Jager from a position slightly in front of the lock in this instance, but it would have been hugely surprising to see Garcès ping the Boks for that.
Cutting to the core of it, McCaw is still free to make a tackle on de Jager here, whatever about the lock’s back being turned to him. It’s a sensational bit of defending from the New Zealand captain, dropping in low to ensure de Jager is felled and comes up just short as he stretches for the line.
Nonetheless, South Africa’s World Cup pool opponents Samoa, Scotland, USA and Japan are sure to have noted this play and will likely be prepared to inform the match officials as to why they believe it against the laws of the game.
Returning to our task at hand – the Kriel try – the Boks run a short phase around the corner though Brüssow, who gets smashed in the tackle by the evergreen McCaw. In another brief aside, it’s worth noting the actions of Aaron Smith after this tackle.
McCaw gets good contact on Brüssow with a high tackle focus, ending up on top as the contest goes to ground.
Typically, McCaw finishes in an awkward position on South Africa’s side of the ball, although he shows characteristic body language to show that he is not attempting to play the ball.
It’s still a messy position for him to be in and we’ve seen other referees like Wayne Barnes mercilessly penalise players for being in this exact area. Garcès has a good look at McCaw’s position, but we’re specifically interested in scrum-half Smith at this point.
As Garcès is undertaking his assessment of McCaw’s position, Smith is shrilly screaming ‘Get out Rich! Get out!’ It’s very difficult to make out the next two words from Smith, but the message is loud and clear from the Highlanders halfback.
We’ve noticed this quite a bit from Smith in recent times around the breakdown, as he almost acts as a second referee for his teammates. There is clearly an impressive focus on discipline in Smith’s intentions, while it’s also worth asking whether his communication influences the referees.
It’s far from certain that Garcès would have pinged McCaw here without Smith being in everyone’s ears showing that the Kiwis wanted to get away from the ball, but there have been similar moments in New Zealand’s other recent games. One worth keeping an eye on.
We’ve digressed again, so back we go to this Kriel try once and for all. McCaw’s defensive actions have ensured that the Boks are operating off slow ball at this point, meaning they need to manufacture quicker possession if they are to threaten.
Vincent Koch is the man to do so, as he makes a simple carry and goes to deck without fuss. There might have been temptation here to look for an extra metre in the tackle (upping those stats!) by bursting upwards into Brodie Retallick and pumping the legs, but the prop understands his role in this situation.
By going straight to ground, Koch may make less of a gain, but he allows Whiteley and de Jager to ruck beyond the ball, suddenly turning it into quicker possession.
It’s not the only reason for the score on the next phase by any means, but it does certainly mean slightly less time for New Zealand’s defence to get their heads up, assess the attacking line and make positive decisions.
From there, Pienaar feeds out-half Handré Pollard, who runs a simple dummy-switch-pop play, more commonly known as ‘DSP’ on rugby fields across the world.
First things first, we have to applaud the superb line from Kriel to score his second try in two Test games, a hugely impressive introduction to the international game.
Before the phase begins, we can see the South African centre – who played at fullback for the entirety of the Super Rugby season with the Bulls – with his head up, scanning the defence and making up his mind on his line.
It’s a trait of all good midfielders, that constant awareness of what’s in front of them, whether it be an opportunity or a potential danger.
Kriel picks a gorgeous line just to the outside of Ma’a Nonu is this instance, one featuring a subtle change of direction that makes all the difference in breaking the defensive line.
It really is delicate but as highlighted above, Kriel initially runs a slight ‘unders’ line, taking him towards Nonu’s body, before he alters the line at a very late stage to a slight ‘overs,’ running to the outside of Nonu. That shift at pace is key.
As with any score in a rugby match, the defensive actions are of equal interest here and Nonu will have been disappointed with his involvement in this score, as will centre partner Conrad Smith.
New Zealand are actually in solid shape at the very start of this phase of play, essentially presented with a five-on-four in the frontline on that right-hand side, with fullback Isreal Dagg in behind as well, a situation they would expect to defend comfortably.
From that decent starting point, they let themselves down.
While the dummy switch of Damian de Allende inside Pollard might not seem hugely important at first glance, it is vital in manipulating Nonu.
Above, we’ve highlighted the brief, brief moment where the dummy switch has stolen Nonu’s attention, distracting him from Kriel. Nonu never actually fully ‘sits down’ or allows himself to be totally checked by the dummy switch, but it means he loses sight of Kriel.
We’ve already spoken of the importance of scanning in attack, but it’s just as essential on D. Nonu never gets his head up here to track Kriel, although he is of course aware of the South African centre.
The difference between those two things is evident in how effective Kriel’s subtle change of line is. Nonu’s brief moment of distraction is caused by de Allende’s line, making Nonu think that Liam Messam might sit down on de Allende, that meaning Nonu would have been required to tackle Pollard.
These are complex calculations to be making in the space of a second, but it leaves Nonu in a poor position to tackle Kriel – ‘his’ man in this case – when Pollard passes the ball.
We see that above as Nonu has grasped out in the air, somewhere in between an intercept attempt and an expected grab of Kriel. His peripheral vision had prepared him for Kriel arriving directly on top of him, but that subtle change of line has taken the South African centre back on the ‘overs’.
What about Conrad Smith outside Nonu? He too misses the tackle on Kriel, so what’s his thought process?
The veteran centre begins in quite a wide position, ostensibly marking up against South Africa Wille le Roux to start with and certainly concerned about the fullback’s threat. He too swiftly becomes aware of the possibility of the switch play and begins to bring himself closer to Nonu.
Smith has a better view of what’s unfolding in front of New Zealand, given his wider angle and increased awareness of Kriel. He can see the threat to Nonu’s outside shoulder, but his reaction is ever so slightly delayed by the option of a miss pass from Pollard.
At the moment we’ve highlighted above, there is still some chance that Pollard can throw the ball over or behind Kriel to the waiting le Roux, meaning Smith would obviously want to be in a position to drift back out onto the Boks fullback.
It means his decisiveness in closing down Kriel is just delayed. The end result of that conundrum and the one in the decision-making part of Nonu’s brain is that both Kiwi centres get to Kriel as he has already burst onto the ball close to the line.
The result is a pair of weak arm tackles on a player moving at real pace, and we can see above how poor Smith and Nonu’s positions are. There are no shoulders behind their tackle attempts, merely soft arms for Kriel to run through.
Even after the stresses placed on them by South Africa’s quick ball, the extra man in attack and the dummy switch, Nonu and Smith will have been disappointed that their usually lightening-quick reflexes didn’t allow them to even slow Kriel to any extent.
On the flip side, the 21-year-old’s intelligent work made his score deserved. Before we finish, the post-linebreak movement of Kriel is notable too, as he heads back towards the posts to take him past Dagg and then straightens to beat the covering Aaron Smith.
Respond in kind
New Zealand didn’t have to wait long to fire a shot back at the the Boks in Ellis Park and, as in the first half, their response was remarkably similar to the South African’s try.
With the Boks playing from inside their own half following the restart – perhaps buoyed by the Kriel try – a brilliant strip by Kiwi hooker Dane Coles result in de Jager spilling the ball forward.
After Aaron Smith unsuccessfully looked to grubber the ball behind the Boks on the advantage, Garcès brought play back for a scrum and Steve Hansen’s men had their platform from which to build Coles’ excellent try.
As we can see in the video above, the scrum goes to deck with the ball yet to emerge, but Garcès shouts ‘Use it!’ when he spots the pill at Read’s feet. This was typical of Garcès in this game, as he constantly looked to avoid stoppages.
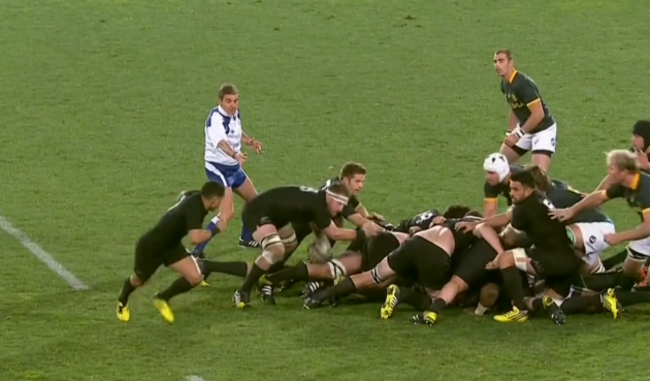
Indeed, the Frenchman contributed to the brilliant contest with his lack of fuss, allowing both sides to play at a breathtaking pace. While this instance might be perceived as dangerous, the general point of allowing play to continue is certainly to be encouraged.
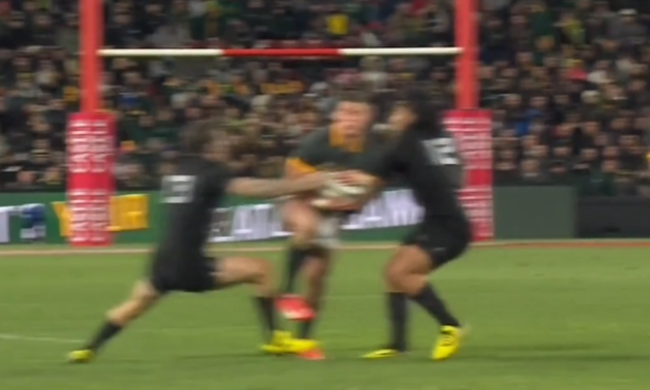
The Kiwis attack right from the scrum, but it’s well defended by the Boks, partly because the collapsed scrum allows Schalk Burger to break off the blindside swiftly and also due to a strong hit by de Allende, allowing Burger to follow up on fullback Dagg.
It means Hansen’s side don’t quite make the gains they might have hoped for, so they move into their pattern with the aim of ensuring they get quick ball at the next ruck, allowing them to stretch the South Africa defence a little more.
Retallick is the man to make the simple carry on this occasion from a characteristically perfect bullet pass by Smith. The towering lock is well tackled by Mtawarira and then Etzebeth joins in high on Retallick, hoping to either make a choke tackle or at the very least slow his ability to recycle, therefore giving South Africa time to fold and get set on D.
Sam Whitelock identifies that threat and takes immediate action, hammering into contact with Etzebeth to bring the tussle straight to ground.
Owen Franks is important too, arriving in to lend his weight and power, ensuring that Etzebeth has no chance of lying over the ball or even flopping a stray arm over it. The result is the ball on a plate for Smith to fire away again.
As the above is unfolding, out-half Pollard recognises that the South Africans are looking at a bad defensive situation. Below, we can see the 21-year-old signalling for players to fold across to the right even before Retallick has been tackled.
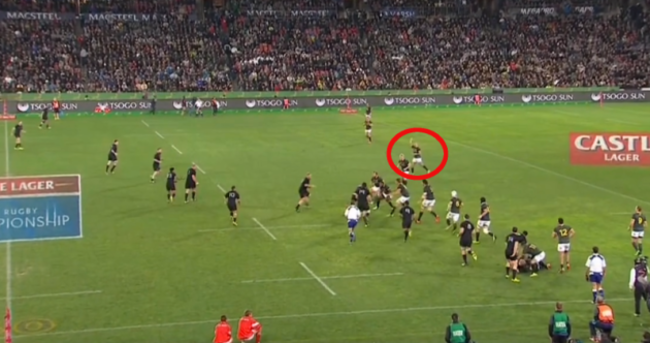
Pollard has taken a scan of the New Zealand attacking line and realised that they are numbers up even before the tackle on Retallick takes three (four if de Jager is included) defenders out of the game.
Below, keep an eye on Pollard at the top of the clip as he beckons, claps his hands and shouts in an attempt to let his teammates know of the urgent need for them to fill that right side of the ruck.
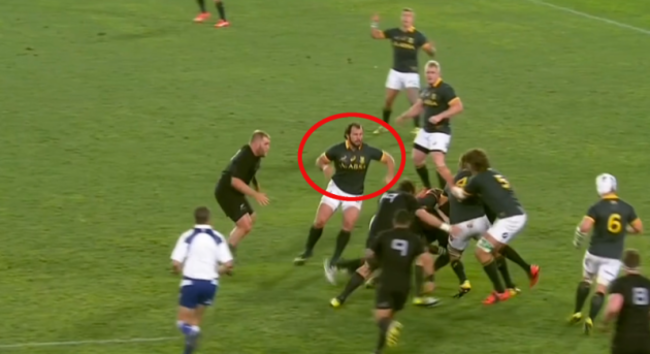
Who’s he signalling to? When we change angle and take a look at the left side of the ruck from South Africa’s point of view, we can see five defensive bodies on the short side against three (four if Read is included) attackers.

The speed of the ruck means it would have been demanding for any of these players to fold across in time, but the fact that two of them are walking at this point might not please head coach Meyer.
As well as this uneven spread of bodies in the defensive line, this Kiwi try also exploits what had been a major South African strength up until that point: the Boks’ incredible breakdown competition.
Below, we see shots of Bismarck du Plessis as the tackle on Retallick is being carried out.
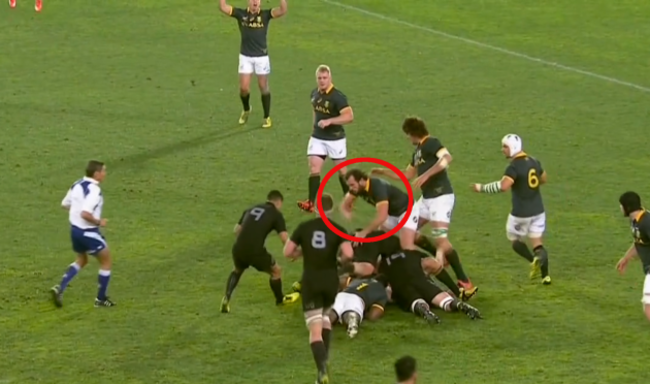
The hooker, who was sublime again last weekend, simply cannot resist the temptation of competing for a possible turnover, as he had licence to do throughout the game in Johannesburg.
Much of the time, du Plessis’ successful turnovers come when he starts inside the tackling player. Indeed, many teams in rugby operate under a policy of only attacking the ball for turnovers through defenders who have started inside the tackler.
As we can see above, du Plessis comes from outside the ball on this occasion. It’s quite likely that he had a free role in terms of attacking the ball on the ground at will, but sometimes it’s not always the best option.
Clearly, du Plessis is one of the South African defenders initially in the best position to answer Pollard’s demands to fill the line on that right side of the ruck. However, he instead opts to go towards the tackle, but with a ruck having formed in the eyes of Garcès, the French tells him ‘No!’ when du Plessis shapes to contest.
So it is that the Boks are left six-on-four down on their right side of the ruck when the ball arrives into Kiwi out-half Lima Sopoaga’s hands. The result is seven points conceded.
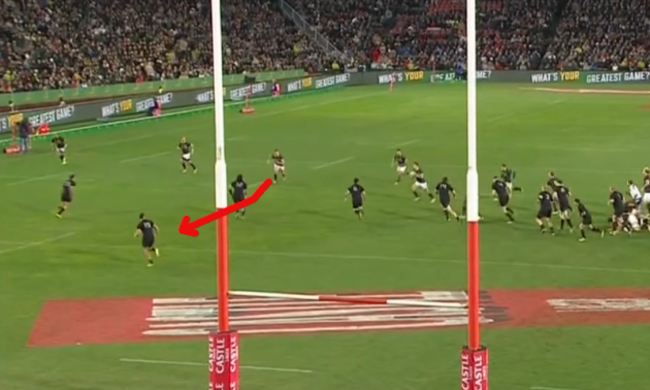
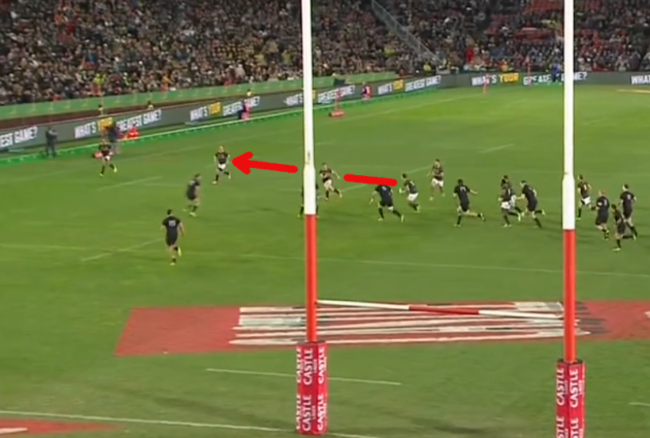
The lack of numbers South Africa have on that side of the ruck means Kriel is left hugely exposed in midfield. He’s aware of the presence of Richie McCaw, Dagg and Charles Piutau to his outside shoulder, creating the overlap.
He’s also aware that Coles is lining up just inside him, although he appears to be hoping that Pollard will be able to drift onto Coles, in turn freeing Kriel to deal with that threat of McCaw, Dagg and Piutau along with Boks right wing Cornal Hendricks.
With Malakai Fekitoa turning on some superb footwork to draw Pollard into him, however, Kriel is left in no man’s land.
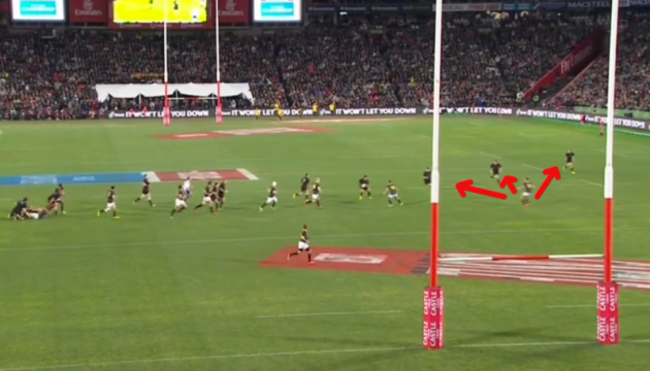
There are attacking threats inside, in front and outside him. That means his reaction to Coles changing his line to run inside him – after Fekitoa has perfectly taken Pollard out of the equation – is just too late and he doesn’t even manage to get a hand to the hooker.
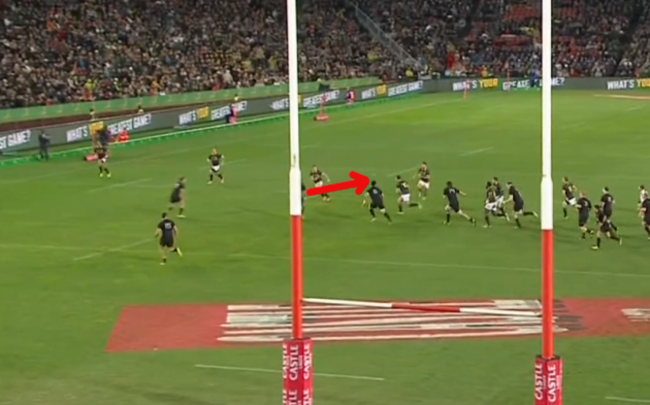
If Kriel’s running line for his own try was deserving of rich praise, then Coles was equally impressive with his subtlety. The Hurricanes front row’s actions here underline how New Zealand’s players are comfortable no matter what they’re asked to do on the pitch; they are simply 15 rugby players rather than men who can only perform a specific role.
The hooker darts on a beautiful unders line here to take him inside Kriel and into the gap, before straightening to evade the desperate attempt of prop Koch to slow him.
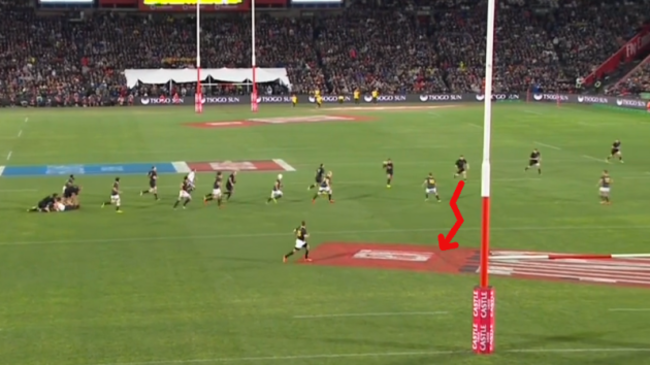
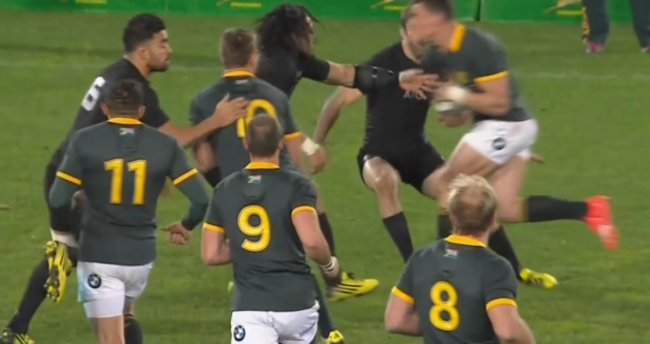
Coles’ final change of direction in beating the defence is to go back inside le Roux, with the fullback having been on a covering line across to the right-hand touchline.
Whatever about the impressive pace and shift of direction from Coles, le Roux will be unhappy with his defensive effort here. The attacking genius also allowed Ben Smith to skip past him untouched near the right corner for the Kiwis’ first-half try, meaning Smith could touch down close to the posts and hand Sopoaga an easy conversion.
Trend
The fact that New Zealand and South Africa’s tries in the first half and again above are similar is certainly notable.
Their counter-attacking scores in the first period were not simply an accident, rather an illustration of the hard work they’ve put into ensuring that aspect of their game is of the highest quality.
Similarly, these second-half tries came by design rather than simple happening. Their similarity makes it evident that both teams are looking for chances to beat the defence on these straightening lines.
These examples show that defensive teams are often starting in wide positions, even before they have managed to get bodies to fold around the corner.
Traditionally, most defences played ‘in to out,’ meaning they had tighter spacing between defenders closer to the ruck, then worked hard to drift or ‘wedge’ onto the attackers further out the pitch once the ball had been passed on.
Linespeed is the name of the game now, however, and that has brought about more ‘out to in’ defence, whereby defenders look to occupy wider starting positions and then hammer up at the attackers, closing them down by coming back towards the source of the ball.
The two tries above show that the spacing issues sometimes cause by that width in the defence can be exploited by intelligent and simple running lines in attack combined with quick ball at ruck time.
Furthermore, the fact that Coles and McCaw set up outside Fekitoa after the scrum in this instance strongly suggests that this breakdown in the South African defence was something they had specifically planned.
World Cup analysts everywhere will have taken note of the pattern.
McCaw the decider
The Kiwis saved their craftiest play of all until the final minutes of the game, running a brilliant lineout move from close range to score the winning try in the 74th minute.

This score has been the basis of a rigorous debate in South Africa and New Zealand, with some strong suggestions that the play is illegal.
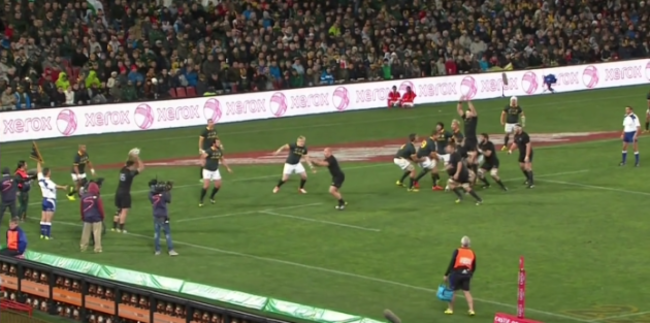
Let’s take a look at the set-up from New Zealand.
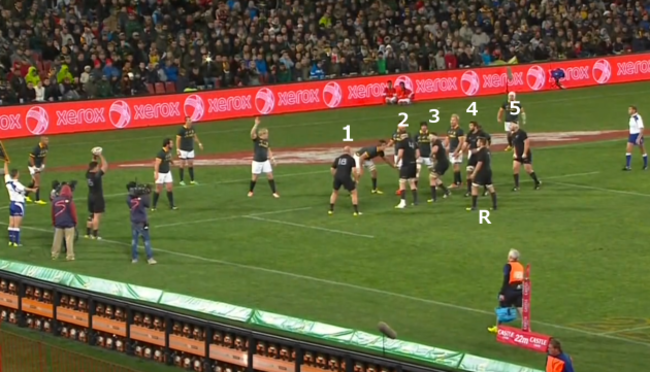
They’ve opted for a five-man lineout here, with Ben Franks (1), Retallick (2), Read (3), Whitelock (4) and Wyatt Crockett (5) forming the actual lineout itself.
McCaw (R) is New Zealander’s receiver in this instance, usually the position taken up by the player to whom the ball is going to be transferred to on a maul drive (that’s what South Africa are expecting), or the scrum-half in other cases.
What of South Africa?
They obviously have to match New Zealand’s five players in the lineout, so Etzebeth (1), Flip van der Merwe (2), Whiteley (3), Burger (4) and Trevor Nyakane (5) are the men to do so.
Defensive sides are entitled to have a receiver too, and in this instance Adriaan Strauss (R) is that man, marking up the space towards the front, as his teammates in the lineout mark up on New Zealand’s jumping options at the front.
Before we move any further, it’s worth highlighting just how committed the Boks are to defending the back of the lineout, their five players roughly in line with just four of the New Zealand lineout players.
It’s worth remembering too that Ireland exploited this habit of the South Africans back in November, when a superbly constructed maul move took advantage of a perceived weakness at the front of the lineout to squeeze Rhys Ruddock through for a try.
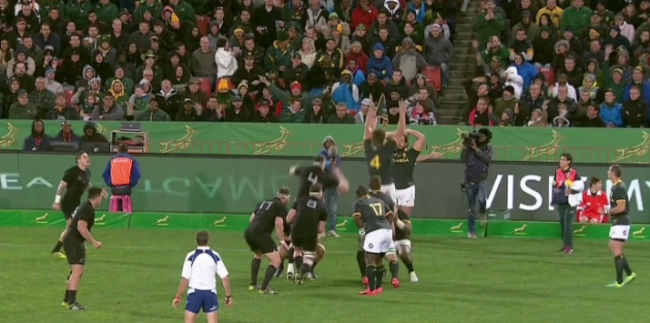
Furthermore, the Boks conceded an almost identical try to McCaw’s when they played Samoa back in 2013, as we can see below.
Evidently, teams are picking up on and exploiting the Boks’ tendency to mark the tail of close-range lineouts strongly. That’s exactly what the Kiwis do in this instance.
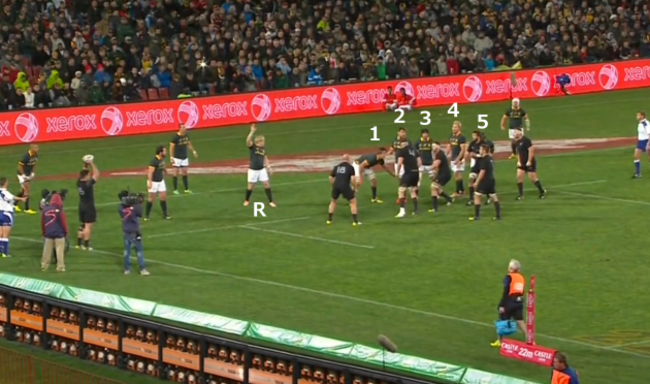
McCaw is the key man in this move, moving into the lineout to accept a clever lobbed throw from Codie Taylor. Is he legally entitled to do so?
The laws of the game state that the receiver must be two metres back from his teammates in the lineout, with Law 19.8 (i) below:
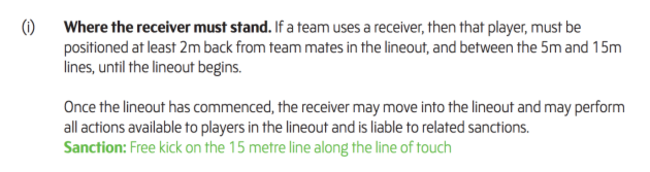
That two metres is obviously the first thing to look at with McCaw, although it’s difficult to be definitive without having been on the pitch to measure the distance precisely.
It’s certainly somewhere close to two metres and even if it isn’t, we very often see receivers this close to the lineout without being sanctioned by referees. The distance of McCaw from the lineout in this case is typical of what we see game after game.
Garcès and his assistant referees obviously don’t have measuring tape as part of their kit, while they are also keeping an eye on a whole range of other possible offences.
Much of the focus for this try has been on McCaw’s distance from the lineout, but Strauss on the South African side is of equal interest as the defensive receiver.
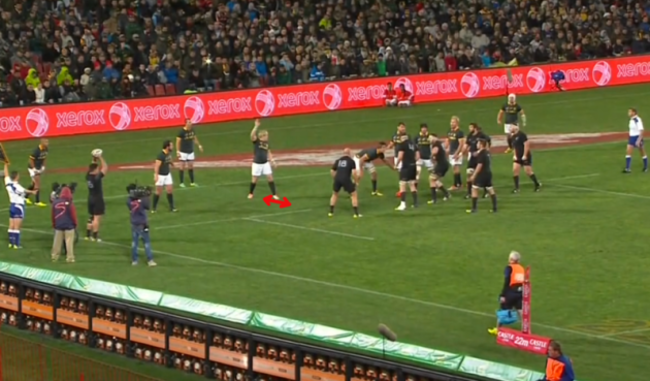
As the defensive receiver, Strauss must also be two metres back from his teammates who form the lineout and it’s arguable whether that is the case.
Simply put, if South Africa have a case that McCaw is not two metres back from the lineout initially, then New Zealand again have an identical case against Strauss.
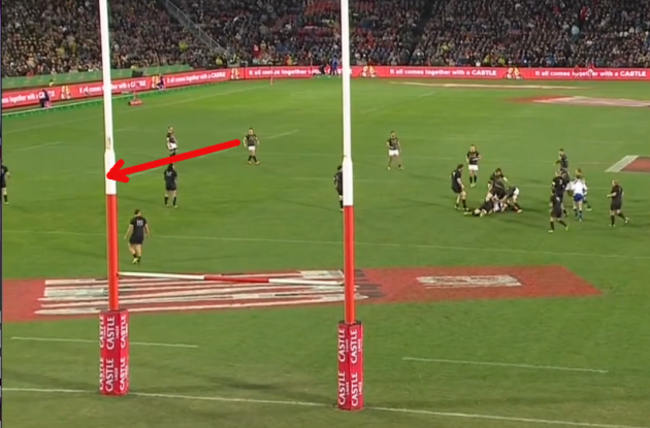
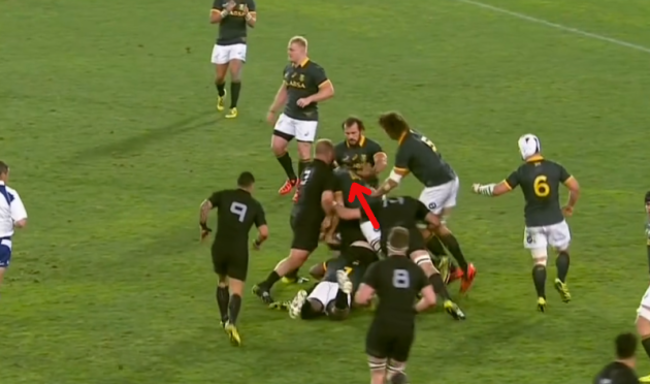
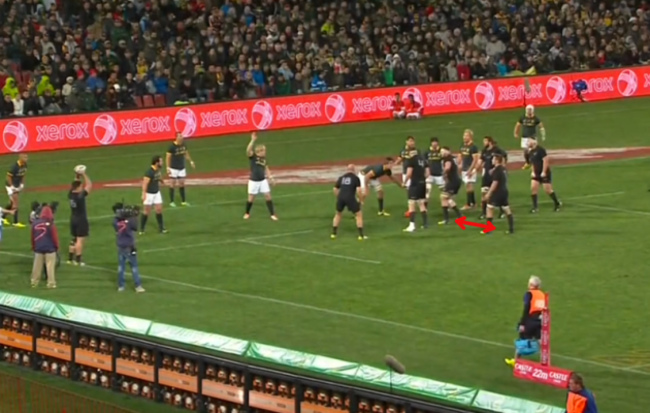
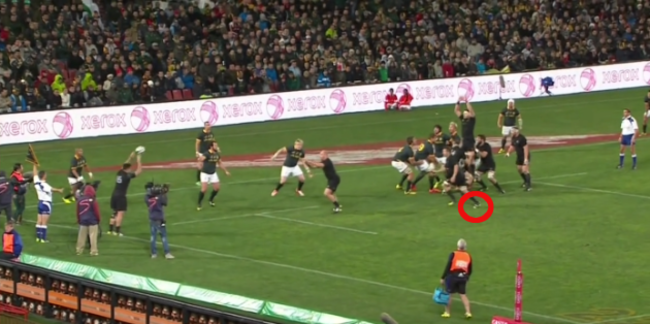
Furthermore, the Kiwis could have taken issue with the positioning of Boks hooker du Plessis, who is in the five-metre channel. Is he in a legal position? Here’s what Law 19.8 (j) tells us:
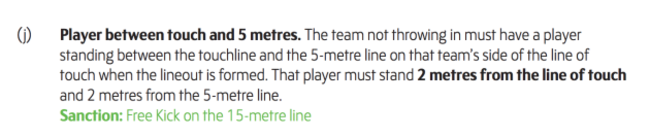
So du Plessis must be two metres back from the line of touch (South Africa’s five-metre line in this case), as well as two metres away from the five-metre line that runs parallel to the touchline.
Does he fulfil that legal demand?
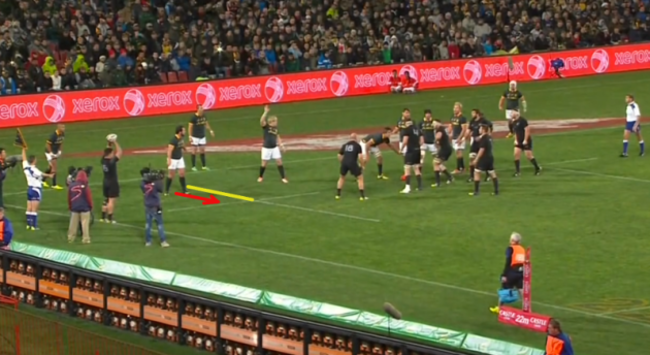
Du Plessis certainly looks to be two metres back from the line of touch (as highlighted by the red arrow) but he also appears to be well within two metres of the five-metre line, and therefore is technically in an illegal position.
The point here is not to flag every action against the laws of the game, rather to underline that they constantly occur and are extremely difficult to track in the pace and pressure of a Test match.
With McCaw and Strauss very similar distances from their teammates in the lineout, and du Plessis definitely illegal, let’s move on and take it that McCaw was indeed two metres back.
Law 19.8 (i) above clearly states that the receiver must by two metres back “until the lineout begins.”
Jump to Law 19.9 (a) and we’re told that this is when a lineout begins:

Does McCaw breach the two-metre distance before the ball leaves Codie Taylor’s hands?
His first step before bursting forward into the space created by the dummy pod at the back of the New Zealand lineout doesn’t appear to move him forward to a great degree.
Even if it does so, it is again barely perceptible in moving him towards his teammates. Arguably, his very first movement is more sideways or diagonal towards the corner flag as he looks to step out from a disguised position behind the jumping pod to enter the opening space.
As the ball leaves Taylor’s hands in the still above, McCaw’s back foot is almost exactly where he started from. The lawbook doesn’t specify whether or not a leg in the air (as McCaw’s left leg is here) signifies breaking that two-metre gap.
Even if we’re to say that McCaw does breach the two-metre distance, we must take a balanced view of the incident. Let’s take a look at Strauss, the South African receiver, to see if he moves towards his teammates before the ball leaves Taylor’s hands.
McCaw’s movement appears to be at exactly the same time as Strauss begins to shift towards his teammates. That bring us back to the sides having equal cases against each other.
If McCaw is breaking what we’re presuming is a two-metre gap, then so too is Strauss. Play on.
The final bone of contention here is that New Zealand’s dummy jumper at the back, Read, has jumped before the ball left Taylor’s hands. That would be illegal under Law 19.10 (f), which reads:

If we go to a freeze frame taken the split second before the ball leaves Taylor’s hands, below, we can see that Read is indeed off the ground already.
Again, we underline that this is something that occurs all the time in rugby and goes unsanctioned. It’s incredibly difficult for the match officials to be certain in this regard with play unfolding so quickly.
Just to highlight that point, below is a clean lineout South Africa won earlier in the game. It took us less than 30 seconds of scanning the match tape to find this example:
Clearly, Etzebeth is off the ground well before the ball has left du Plessis’ hands. South Africa use Etzebeth’s speed off the ground in this manner very often to win clean lineout ball, should there be a free-kick against them every time?
Under the letter of law, absolutely. But that’s not how this sport functions.
New Zealand do get some advantage from Read leaving the ground early on their try, of course, but so too do South Arica in getting clean ball in the instance above and many others. Perhaps they are not equal examples, but the point is that it regularly occurs.
The42‘s main focus on this try is instead the beauty of its simplicity and intelligence. There are few greater feelings in the rugby that the perfect execution of a pre-planned and well-rehearsed set-piece play.
The Kiwis lured South Africa to the tail here, sent Franks on a dummy run to the front to draw in Strauss and du Plessis, then took a risk in lofting their throw into the unknown and timed it all supremely.
A beautiful moment to decide a stunning game of rugby for which both sides deserve hearty congratulations.
