ENGLAND CAN CLINCH a sensational series win over the Wallabies on Saturday with a win in the second Test in Melbourne but they’ll have to keep the Australians’ intelligent attack quiet if they are to do so.

Eddie Jones’ men enjoyed a brilliant 39-28 victory in last weekend’s first Test in Brisbane but gave up four tries in the process.
Ensuring that they get a better grip on Australia’s 1-3-3-1 attack will go a long way towards helping England make history in the next two fixtures.
1-3-3-1
1-3-3-1 is essentially a method of organising a team’s forwards in phase-play attack. The figures add up to eight and, so, the 1-3-3-1 refers to the pack of eight forwards and how they locate themselves when attacking.
We’ve studied the 2-4-2 alignment that the likes of the Crusaders, a huge number of other Kiwi sides and Connacht operate with in attack and 1-3-3-1 is simply another set-up along similar lines.
The Wallabies are among the sides who operate under the 1-3-3-1 system, with their excellent attack coach Stephen Larkham leading the efforts.

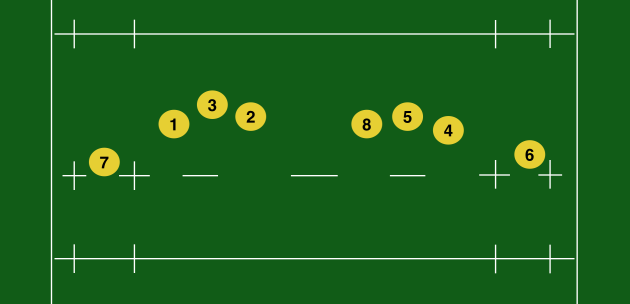
Above, we get an idea of the 1-3-3-1 shape on the pitch. We’ve removed all backline players for the purposes of clarity here.
One of the back row forwards holds width in the left-hand 15-metre channel [6], the three front row forwards form a group left of the central part of the pitch [3, 2 and 1], the two locks and a back row player do the same to the right [4,5 and 8], and the final back row forward holds width in the right-hand 15-metre channel [7].
That gives us our 1-3-3-1 shape.
The backs then work around that basic shape and one of the things that makes the Wallabies so effective is that they are fluid in how they roam and manipulate around their own attacking shape.
Even in the case of the forwards themselves, the structure is not completely rigid. For example, the run of play may mean that the organisation we see below makes more sense.
As we can see above, the flankers are now on different sides of the pitch, while the organisation of each of those ’3′ groupings has also altered.
How the Wallabies have attacked off set-piece, who has arrived earliest into position, what the backs want, and all sorts of other factors play into how the pieces fall into place but Michael Cheika’s side generally do hold a 1-3-3-1 shape when attacking in phase play.
Try-scoring shape
The try scored by Israel Folau in last weekend’s first Test provides a fine example of the Wallabies’ shape in action.
They play away from a ruck on the right-hand side of the pitch, where we can see openside flanker Michael Hooper [7] in that 15-metre channel having resourced the ruck.
Scrum-half Nick Phipps moves the ball back inside and we see the first pod of three forwards come into play.
Rory Arnold [4], David Pocock [8] and Rob Simmons [5] form the group.
With England’s defence coming forward and with the Wallabies keen to tie in more defenders as they maintain their tempo, Arnold opts to carry with the other two members of the trio supporting him.
With Pocock removing the turnover threat of Dan Cole rapidly and Simmons providing a guard over the ball, Phipps can move it away at pace, asking a question of the English defence with that rapid recycle.
On the next phase, we see the second pod of three forwards in action and we also get an excellent demonstration of how Australia’s backs work around their 1-3-3-1 shape.
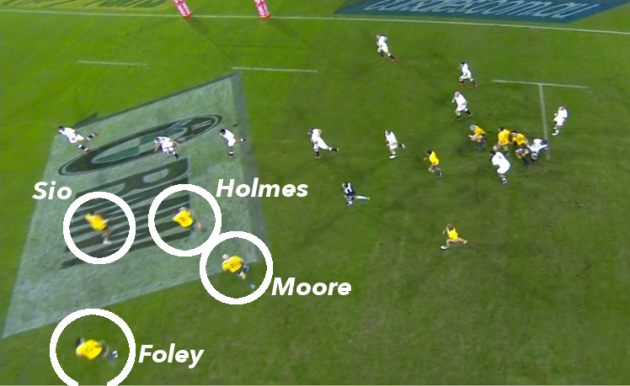
Above, we can see that Stephen Moore [2], Greg Holmes [3] and Scott Sio [1] form the group of three forwards. We can also pick out out-half Bernard Foley hovering in behind to provide the back-door option for the Wallabies to play a second-wave attack.
Phipps hits Holmes in the middle of the pod and for many teams that would simply result in their tighthead carrying the ball.
However, key to the Australians being able to use their 1-3-3-1 system effectively is their forwards’ mobility and ball-handling skills. Holmes is comfortable enough to spin around and send his pass out the back to the deeper-lying Foley.
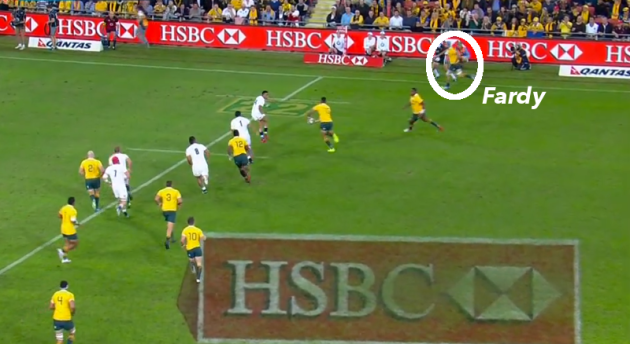
Making life so much more difficult for the English defence in this case, as Foley gets on the ball, is the width of the Wallabies’ attack.
One reason for that width is the positioning of blindside flanker Scott Fardy [6] out on the left, fulfilling his role in the Wallabies’ 1-3-3-1 shape.
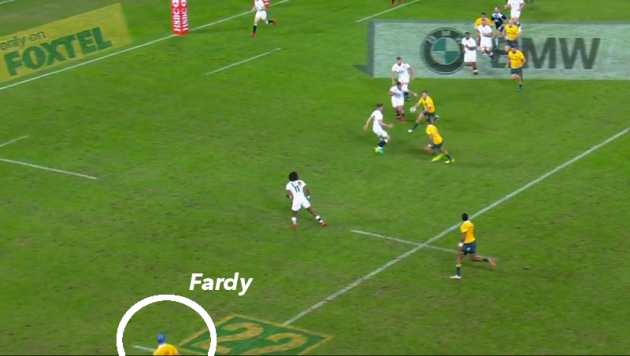
It’s fullback Israel Folau who scores the try for Australia in this case, taking a clever line off a beautiful pass from Foley, but it’s worth noting exactly how the Wallabies’ attack stresses the English defence.
With the ball in Holmes’ hands below we can see what the straightening running line of Sio to his left does to England lock George Kruis.
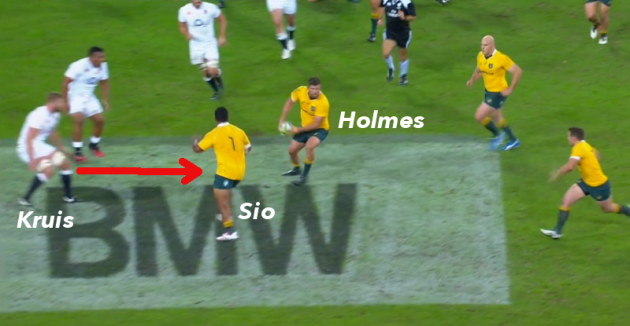
Even with defenders inside him drifting out, Kruis is briefly sat down by Sio’s run as he worries about Holmes slipping the short tip-on pass to the loosehead prop.
The pass goes out the back to Foley and now Kruis has to burst onto the accelerator as he looks to get at the Australia out-half.
Outside Kruis, Luther Burrell is now suddenly worried about the threat of Foley on the ball and he has to check any intention of drifting further out the line to confront the Wallabies out-half.
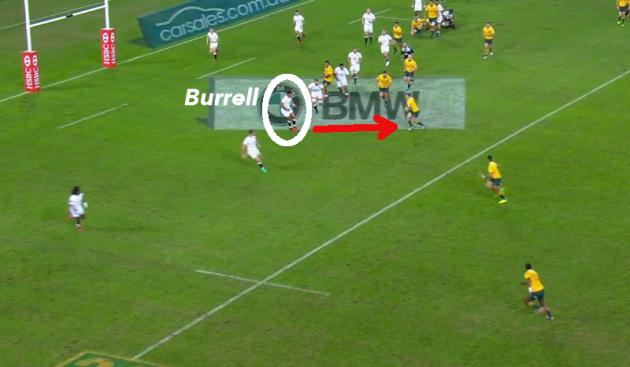
Outside Burrell is Owen Farrell and his reaction to the clear danger is to rush up and look to close off the wide passing option – as England’s defensive system demands.

As that is happening, however, Burrell loses his linespeed and takes two steps across the pitch, rather than forward.
If Farrell’s decision to rush up to close off the short passing option is going to be successful he needs Burrell to do the same thing by hammering up and pressuring Foley.
Simply put, Burrell is on a completely different wavelength to Farrell and the dog leg in the defence is created. Foley spots the space in behind Farrell and darts towards it.
Farrell realises that Foley is looking to run for that hole and now turns his shoulders infield, worrying about the out-half breaking.

Farrell is now in no man’s land, back-peddling and having lost sight of Folau completely. Foley has the creativity and skill to flash the pass past Farrell’s right shoulder to Folau, who reads the situation wonderfully to run a superb line into space and through Farrell’s despairing grab.
With Marland Yarde having rush up cohesively with Farrell initially, there is no hope of his wing jamming in for a hit. Folau’s pace and power also sees him burst well clear of the sweeping fullback Mike Brown in behind.
This superb score is built on Australia’s 1-3-3-1 shape but the real key is Holmes’ ability to pass the ball, then the attacking intelligence of Foley and Folau in exploiting a stretched defence.
The shape is merely a framework in which those skills can flourish.
Mixing it up
The key to many things in rugby is flexibility. If you’re going to do one thing the same way every single time, it’s not going to be successful for very long. Variety is the spice of life.
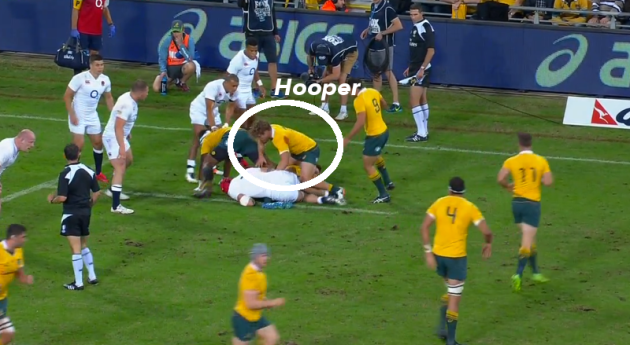
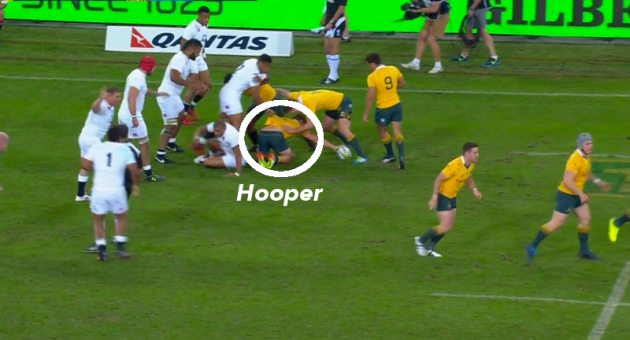
Moving back to the attack that led to Hooper’s opening try for Australia in the first Test, we see the Wallabies utilise their 1-3-3-1 a little differently.
Again, we join as they play away from the right-hand side of the pitch and Hooper is part of the ruck, this time having carried the ball.
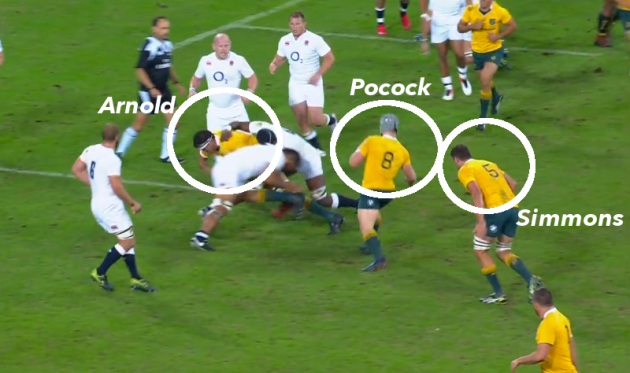
Our first grouping of three forwards is made up of Pocock, Arnold and Simmons once again but on this occasion Arnold releases a tip-on pass to Simmons on his left shoulder as the English defence rushes up on him.
We can see that the tip-on pass means Arnold doesn’t get smashed behind the gainline ball-and-all, with this being another demonstration of the Australian forwards’ passing skills.
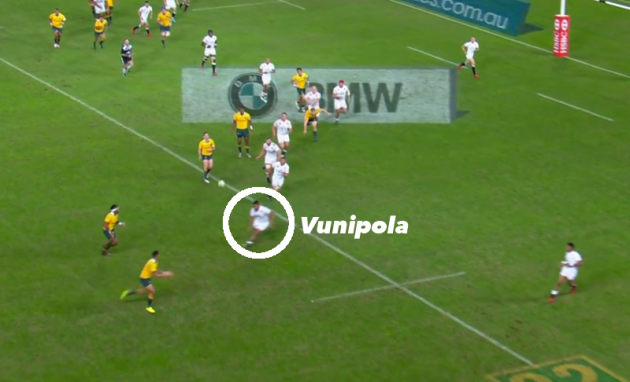
That said, the turnover competition offered by Mako Vunipola over the ball also highlights the ‘danger’ of the tip-on pass. With Arnold being bumped by Kruis after he passes, he is obviously slower to arrive to the ruck. Pocock is coming from the very inside of the pod so has further to travel too.
Vunipola very nearly wins a turnover but Pocock again redeems the situation with an excellent hit on the England loosehead, driving his shoulder in low to win the ‘shoulder battle’ and he also benefits from the arrival of Arnold.
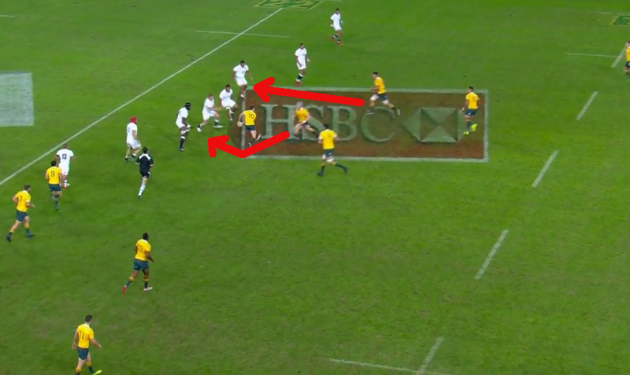
Australia play away to the left and the next grouping of three forwards is important.
Foley is first receiver on this occasion, with the three forwards lining up outside him. Wing Dane Haylett-Petty offers Foley an inside pass option, while fullback Folau begins alongside Holmes and then drifts out the back of Moore and Sio.
Foley tunnels his pass to the drifting Folau in front of Holmes and behind Moore and Sio.
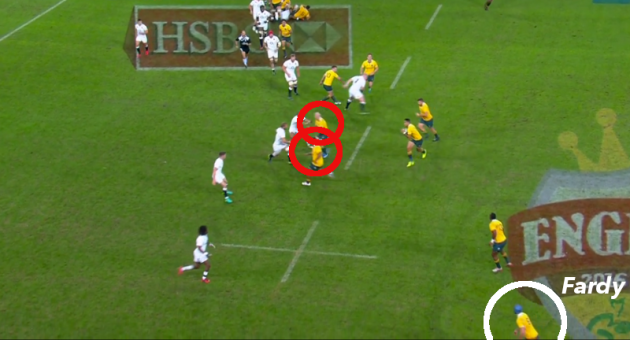
We can see above that Fardy is again holding helping to hold the width for Australia as is his role within the 1-3-3-1.
Moore and Sio [marked in red] are essentially attempting tie down the midfield defenders and give Folau time on the ball. The key is that they are a genuine threat to the defence as carriers before Foley has released his pass.
Sio and Moore hold enough depth initially that the out-half could hit them with a pass if the space opened there. Instead, he goes out the back to Folau.
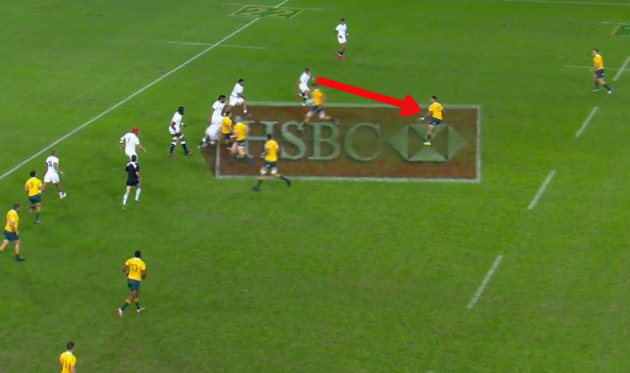
Chris Robshaw does well to read the pass and advance past Sio to target Folau but Farrell, in the defensive line outside Robshaw and marked below, is also very briefly interested by the fullback.
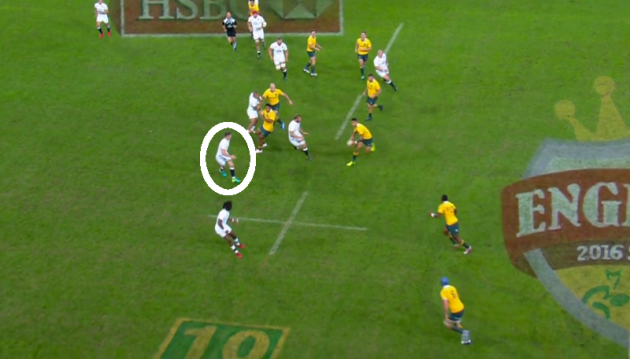
With numbers up for Australia on the left it suddenly looks dangerous for England but Farrell – having kept his body open and angled towards the touchline – can drift on out to make the tackle on Fardy.
Nonetheless, Farrell is stretching to make the tackle against a bigger man – having powerful forwards to create physical mismatches in wide channels is part of the thinking behind the 1-3-3-1 – and the Wallabies make decent gains.
Coming immediately back to the right, the pod of Moore, Sio and Holmes are back on their feet ready and waiting to continue the attack.
Coming back from the touchline, it’s always going to be hard to go directly to the width again and Sio makes a good decision to carry hard here, slamming through the tackle of Kruis for further gains and providing a platform for the wide attack.
As Sio is thundering forward, we can already see the players to the right of the forthcoming ruck taking shape.
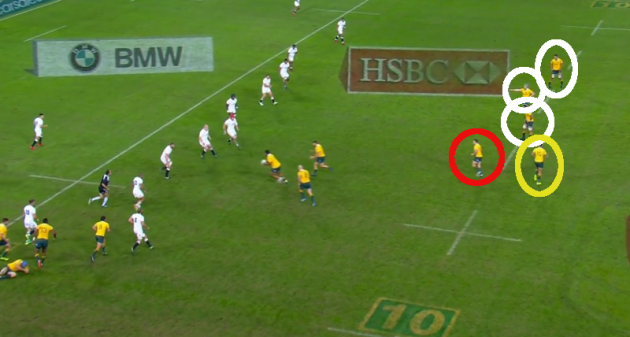
The three-man pod of Arnold, Pocock and Simmons are highlighted in white above, lining up outside first receiver Foley [red]. Fullback Folau [yellow] is making his way across to set himself in behind the three-man pod of forwards.
Again, we see a different function from the forwards around Foley as Phipps fires the pass right.
Arnold is probably too deep here to ever be a realistic carrier but he is vaguely offering an inside pass option for Foley.
Pocock runs the switch line under Foley, while Simmons runs a straightening line to interest the defence as the out-half screens him and finds Folau in behind.
Folau breaks the despairing tackle of Mako Vunipola and fires a gorgeous wide to Hooper, our openside flanker who has kept his width ever since that initial carry at the beginning of the passage. With the Wallabies halted a metre out, the try follows swiftly.
Again, it’s worth looking at what happens in the English defence here.
Pocock’s switch with Foley sits down three of the English defenders in midfield, while Simmons’ direct line interests Vunipola.
England should really be avoiding the situation where their loosehead prop is this far out from the ruck and they improved notably in this area as the game continued, getting more mobile defenders like Maro Itoje and their back row further out the defensive line.
Vunipola actually reacts well to Foley’s pass in this instance but he’s never going to have the pace to track across and tackle Folau.
Outside Vunipola, Burrell now must hammer up and look to shut the ball down on Folau – as England’s defensive system would have him do.
The difficulty for Burrell is that he knows Australia have three men [including Hooper] outside Folau – a clear overlap. So while he initially does look like he’s going to rush up and try to make the spot tackle, he then sits off again and slides across the pitch.
That leaves Folau one-on-one with Vunipola and already with a big headstart. The loosehead has no chance of making the tackle and Folau scorches through to lay the platform for the try.
It’s the Australian width – helped by Hooper being that ’1′ out on the right – that makes Burrell’s life so difficult but Paul Gustard’s defensive system demands that players are aggressive and embrace the ‘risk’ of hammering up in instances like this one.
Burrell was replaced in the 29th minute by Eddie Jones and England’s defence became markedly more aggressive, helping them to turn the game around.
Shifting shape
As with the positioning of the forwards, Australia’s backs often end up taking various different roles as they roam around the pitch. Haylett-Petty, for example, popped up all across the pitch on his impressive Test debut.
Cheika and Larkham’s vision is of a team whose jersey numbers perhaps count a little less. In the instance below, we see that it’s Sio who pulls the deep pass back to Samu Kerevi in behind.
Again, note how Mako Vunipola is located out towards the edge of England’s defensive line, just inside left wing Anthony Watson.
Realistically, this is a blown try-scoring chance for Australia. When Kerevi feeds Folau, it’s a very positive three-on-two opportunity, it not a three-on-one.
This time Fardy is holding the width out on the right and the chance for Folau to dummy out to his flanker, selling Watson, and skin Vunipola is very real.
Instead, he hits Tevita Kuridrani on a switch line and the chance is wasted. Several phases later, Itoje wins a turnover under the England posts. Nonetheless, it’s a clear sign of how Australia stretched Jones’ side with their shape.
The Wallabies consistently showed that they are comfortable with swapping roles within their 1-3-3-1 shape.

For the disallowed Foley try above, we can see that it’s a new grouping of Moore, Holmes and Arnold who make up the three-man pod.
Moore, the closest to the ruck, acts as the passing link to Foley in behind and, once again, we can see how the wide forward [Pocock fills the role this time] helps to draw the defence onto the drift and gives Foley a chance to dart at the line.
The match officials pick up Arnold for bumping Burrell off the ball, however, and the score is ruled out.
Even when Australia don’t have all three forwards available for their next pod, they are adaptable.
Christian Leali’ifano slots in at first receiver here and has only Pocock of his forwards available to his right.
However, Kuridrani steps up with Pocock to help interest the midfield defence as Leali’ifano finds Foley in behind. It’s not a three-man pod obviously, but it’s as good as the Wallabies can come up with and they adapt.
We can see that by now England’s defence is much more aggressive and they do get the outside edge right up, this time with Billy Vunipola on the very outside tip.
But again we see the value of another common thread throughout all the examples we’ve looked at here – depth.
The ruck Phipps starts this phase from is almost 10 metres inside the England 22 but Foley and Folau both pass and receive the ball outside the 22. That depth, combined with superb passing and the work of Pocock and Kuridrani mean that even with the English linespeed ramped up, Australia can beat them.
Width is key too and again it’s Hooper who fulfils his role by holding to the touchline. He gets his reward with the try.
Remarkably, the above score comes when Australia are down to 14 men against England’s 15, with Sio sitting in the sin bin. That point alone illustrates how much trouble the Wallabies’ attack caused England.
Of course, the fact that Sio was in the bin underlines the scrum problems Australia had, to which Cheika has reacted by changing both of his starting props. Even with personnel changes the Australian attacking shape will remain the same.
The Wallabies must resolve their scrum issues, improve their decision-making around kicking for the posts over the corner, cut out the sloppy errors that hindered them in the second half, adapt to the aggression of England’s play and reduce the number of silly penalty concessions in the second Test on Saturday.
England’s effort to shut down the Wallabies’ attack is just one part of a huge Test in Melbourne but it will be fascinating.
- This article was updated at 10.47am on 17 June to correct the first names of Nick Phipps and Rory Arnold.
The42 is on Snapchat! Tap the button below on your phone to add!
