WITH THE VAST majority of rugby defences now operating with aggression out on the edges – the wings hammering up hard, and very often inwards – we have seen ‘bridge’ passes becoming crucial to attacking with width.
These overhead passes are now being lobbed over the edge defender with regularity, with accuracy in this type of pass essential.
There is an obvious risk of being intercepted that comes with the bridge pass, while there is equal pressure on the passer to ensure the ball doesn’t hang up in the air for too long, therefore allowing the interior defenders to recover and drift across to tackle the recipient.
Bridge passes are certainly not new in the game but they have been omnipresent in the opening three rounds of this year’s Six Nations – proving vital as a try-assisting weapon in several games.
The evidence suggests that players and teams across the board have been working harder on this type of pass in recent seasons, with the trend of aggression in defences also allowing more practice in high-pressure situations.
Italian inspiration
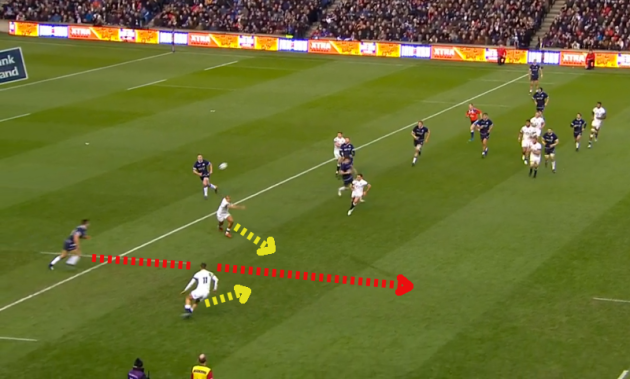
Italy showed the effectiveness of the bridge pass in their round one defeat to England, with out-half Tommaso Allan throwing a superb assist for Tommaso Benvenuti’s first-half try.
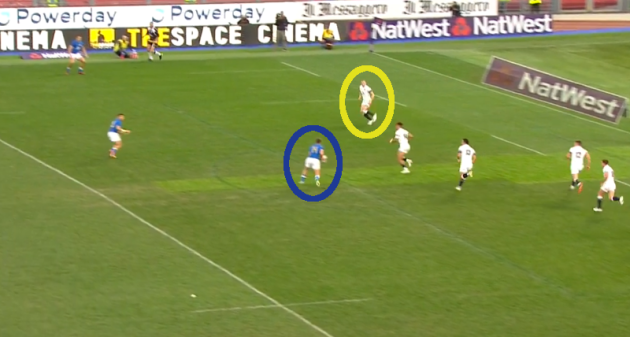
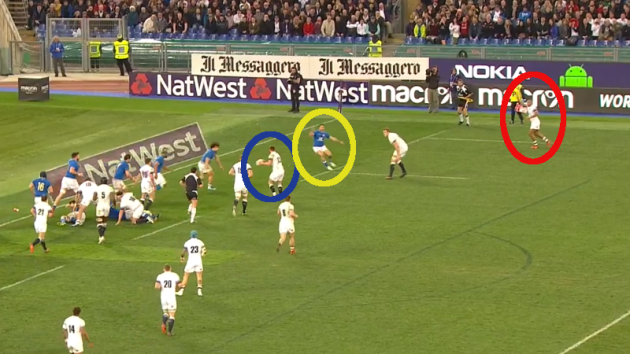
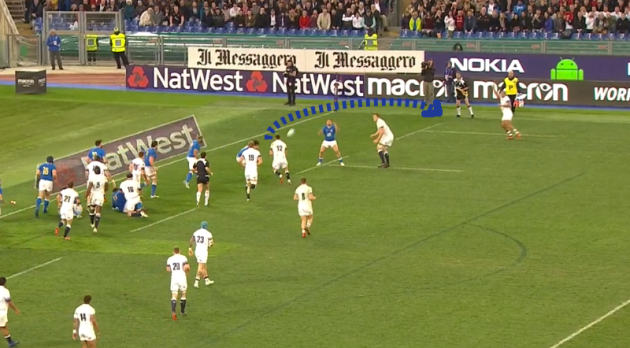
Before Allan’s assist, a link pass from loosehead prop Andrea Lovotti [circled in red below] out the back door to the out-half is key in luring England into compressing.
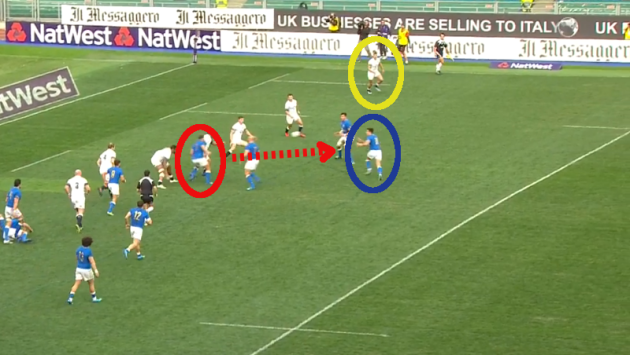
Allan [circled in blue] receives the ball from Lovotti and the player who is exposed on England’s outside edge is Jonny May [yellow].
Having scanned the defence before Lovotti’s pass, Allan knows he has Benvenuti hugging the touchline, while he is also aware that England’s defensive policy means May is likely to come up and in on Italy fullback Matteo Minozzi.
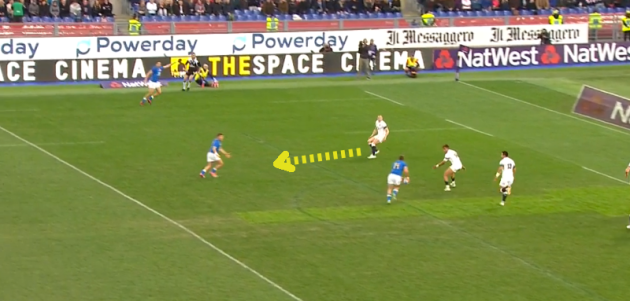
We can see that movement from May below.
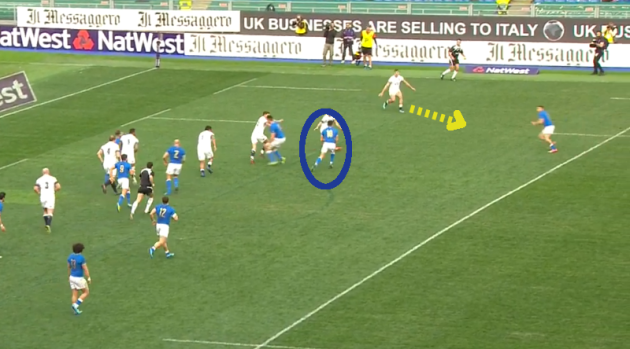
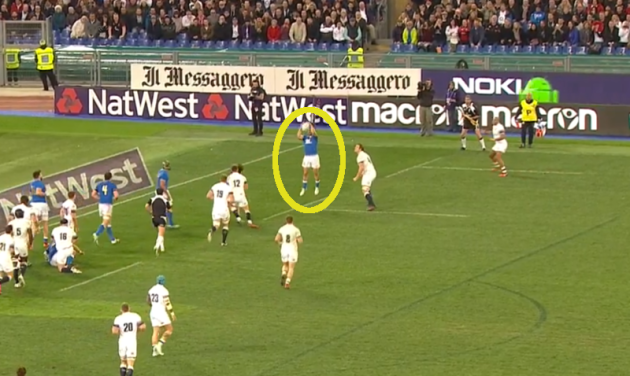
Allan makes a swift decision, winding up his pass and firing it over May, while under severe pressure from Owen Farrell.
We can see Benvenuti [red] just coming into shot in the image above, bursting forward onto Allan’s beautifully-weighted pass.
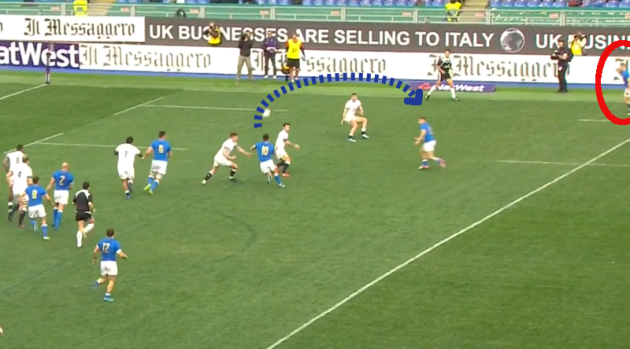
While the height of the pass from Allan takes it well clear of May’s head, the expertly-calculated dip means that it drops immediately down into Benvenuti’s hands.
With May having to turn and accelerate from a standing start, Benvenuti’s momentum and pace is always going to take him clear and he rewards Allan’s pass with the try.
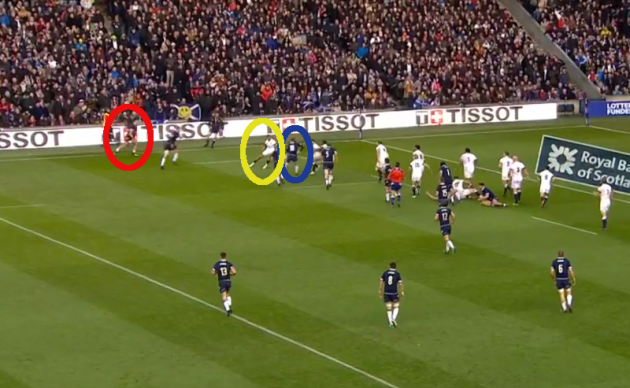
Later in this same game, we saw Conor O’Shea’s side finishing their second try with another bridge pass over the final defender.
On this occasion, Benvenuti turns provider as Italy exploit the overlap skillfully.
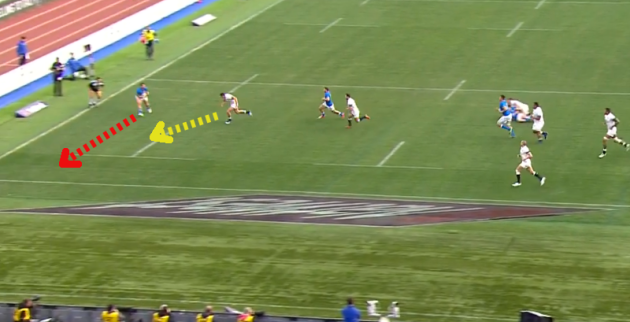
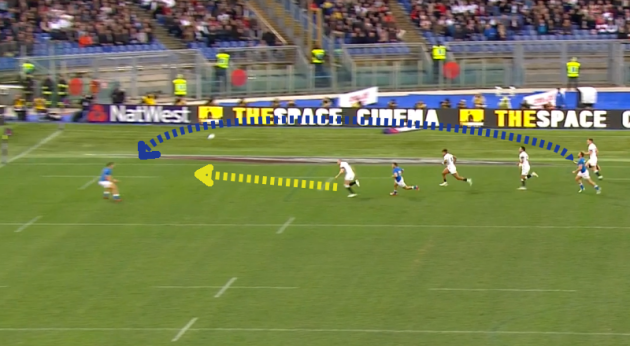
After excellent work from the Italian pack and another vital link pass from Sergio Parisse, we can see how exposed Mike Brown [yellow below] is when Benvenuti [blue] gets on the ball.
There is clearly less scope for Brown to prevent a score here, but again the initial reaction is to shut down the closest passing option of Italy fullback Minozzi.
That gives Benvenuti the opportunity to really test his passing skills and he floats the ball over Brown’s head to the waiting Mattia Bellini.
The ball does hang in the air longer in this instance and forces Bellini to check – it is over a greater distance, to be fair – but Brown has too much ground to make up and although he gets a tackle in, the Italian wing is able to dot down in the corner.
Russell’s moment of magic
These bridge passes are not always made or attempted on the very edge of the defence, however, and Finn Russell’s stunning pass to Huw Jones against England last weekend is a fine illustration of that.
Russell’s pass was enough to make rugby lovers genuinely emotional, such was the vision, daring and skill level involved. One for the ages, it deserves a place in a museum of some kind.
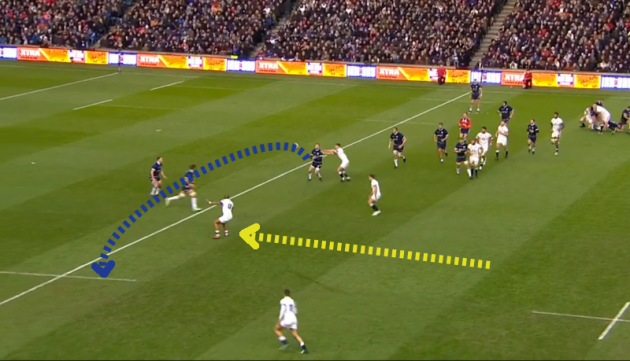
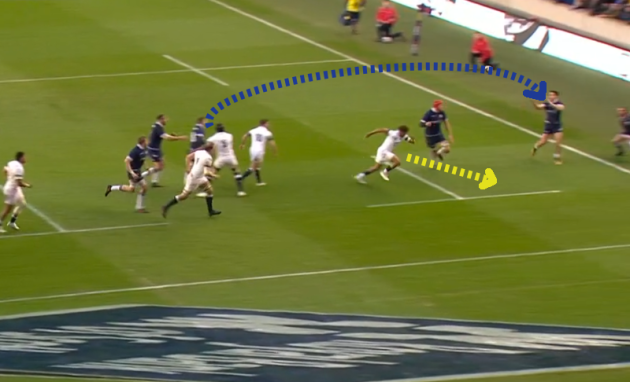
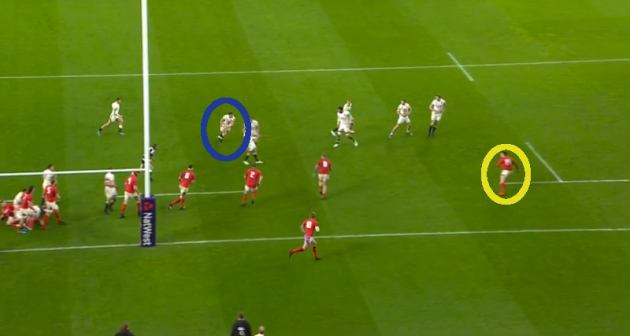
Again, a link pass from a forward is key to opening up the opportunity, with Jonny Gray [red below] swivelling to hit Russell [blue] in the second wave of the attack.

It’s clear how disconnected Jonathan Joseph [yellow] is from the England defenders either side of him, George Ford on the inside and Jonny May on the outside [at the bottom of the image above].
This disconnection on the outside of Joseph is something Russell might have seen in Scotland’s pre-match analysis but his reaction to the cue of Joseph rushing up aggressively [yellow below] is sensational.
While we can’t yet see Huw Jones in the image above, Russell’s pass flies up, over, and well clear of Joseph’s head before dipping viciously at the end of its flight.
Jones deserves credit for his line, of course, but the overhead replay of this pass shows us that the outside centre hasn’t even started sprinting into this space until after
Russell releases his pass.
Russell’s pass invites Jones to the party and it turns out to be a very enjoyable one indeed.
With Russell having weighted his pass so perfectly, Jones can gather the ball moving to full pace and without checking at all, meaning Joseph and May cannot instantly recover to tackle him.
The Scotland midfielder bursts downfield, making it all the way to the 22 before May shows impressive pace to track back and tackle him.
Scotland sense blood, however, and Ryan Wilson plays scrum-half before John Barclay offloads and hooker Stuart McInally makes an excellent carry through Owen Farrell.
From that ruck, Russell gets back on the ball and delivers another bridge pass – this time on the left edge – to allow Sean Maitland to score.
Russell [blue] is on the ball above and he can see that England wing Anthony Watson [yellow] has shot up and in, attempting to close off his passing option.
But Maitland is on the touchline and, again, Russell goes overhead.
Watson turns and gets contact onto Maitland but can’t recover to prevent the Scotland wing from finishing an excellent team try in which Russell plays the starring role.
Welsh wonder, Welsh woe
Ireland were damaged by Wales’ bridge passing last weekend, with two strong examples coming in their attack for the Aaron Shingler try.
As with all of these examples, there are defensive issues that contribute greatly but here we focus more on the attacking decision-making and execution.
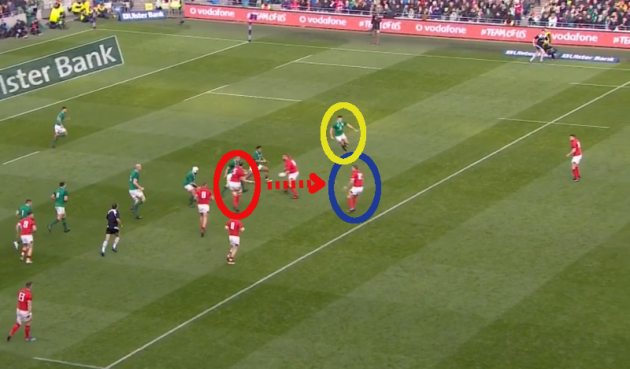
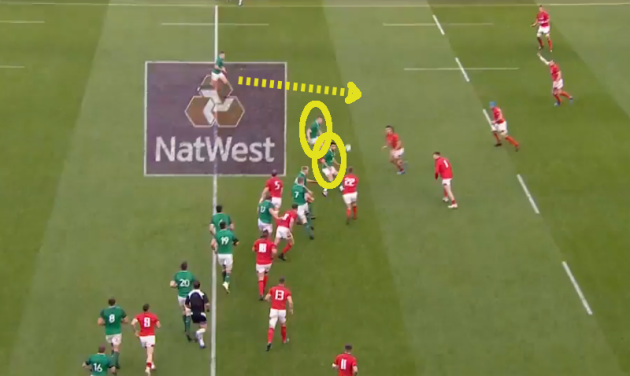
Once again, a forward offering a pass is involved, as Ross Moriarty [red below] finds Scott Williams [blue].
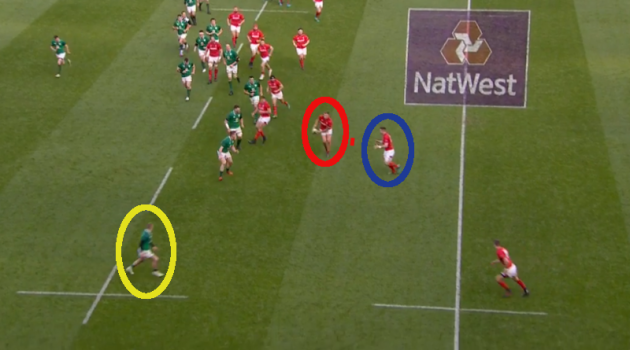
Ireland’s poor work on the inside has left Keith Earls [yellow] exposed and again he follows his team’s defensive policy to press up on the second last attacker, Wales fullback Liam Williams.
Scott Williams doesn’t require a second invitation and he skillfully fires the ball over Earls’ head, high enough to clear the Ireland wing but low enough to ensures that left wing Steff Evans is going to have a headstart on Earls.
Evans accelerates and although Earls catches him from behind, the Scarlets flyer offloads inside for Liam Williams to carry to within 15 metres of the Irish tryline.
Two phases later, we get another bridge pass to help finish Ireland off.
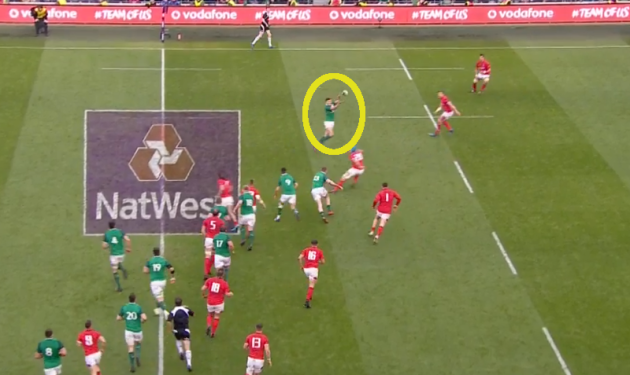
Once again, the link pass from a forward opens the door. Alun Wyn Jones [red] is the man to turn and go out the back door, with Hadleigh Parkes [blue] lying in wait.
Jacob Stockdale [yellow] is the player exposed on the outside edge for Ireland here, and he’s the one who Parkes passes over.
The Ulster wing is stressed by the poor work inside him in previous phases but he makes Parkes’ decision far more straightforward by shooting up and in on the Wales centre [yellow below].
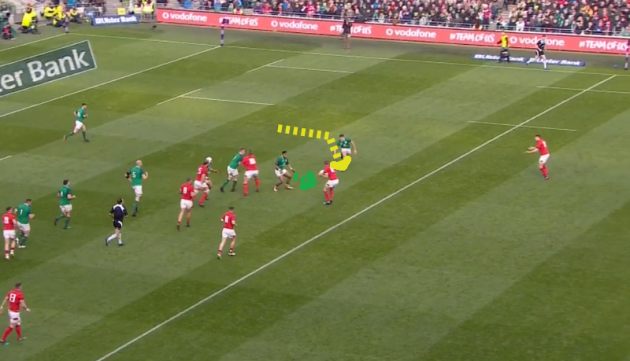
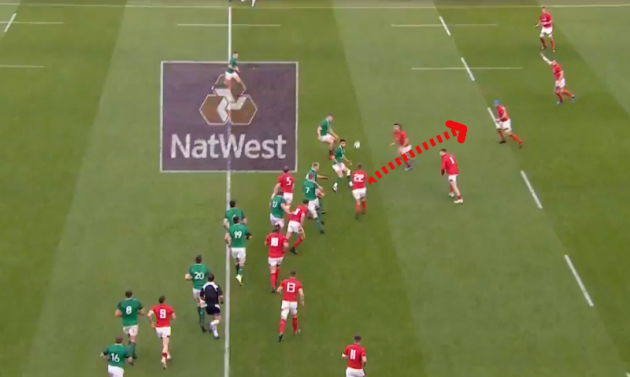
We can see above that Bundee Aki [green] has actually got out to defend Parkes, meaning Ireland have two defenders on one attacker.
Parkes takes advantage skillfully, just clearing Stockdale’s head with a long pass wide to Josh Navidi in the three-man overlap.
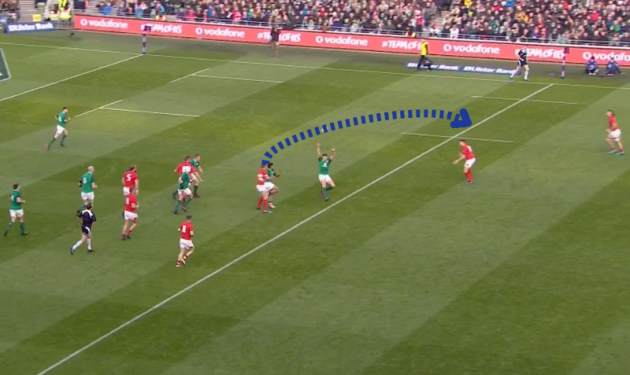
Navidi is then able to comfortably draw in final defender Rob Kearney in the backfield and free Shingler to score.
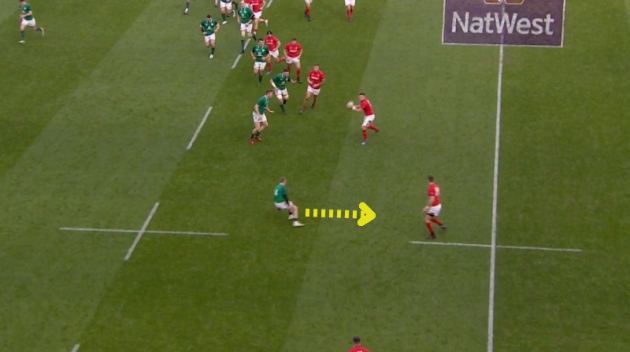
Of course, Wales had a far less satisfactory outcome with another overhead pass in this game, as Stockdale made a good read and picked off Gareth Anscombe for the game-sealing try.
With Conor Murray and Chris Farrell [yellow below] pressing up in midfield, Anscombe opts for a long, floating pass over their heads.
Stockdale is not in the frontline, instead hanging deeper having initially been in the backfield covering the possible kick space.
As he advances, Anscombe invitingly floats the pass – which doesn’t take Stockdale into account – and the Ulsterman rapidly reacts to sprint forward and catch it cleanly.
The execution from Anscombe is poor, but the decision to use an overhead pass is the real issue from an attacking point of view.
Anscombe will likely have reflected that going to Justin Tipuric with a screen pass [as indicated below] would have been the better option in this instance.
But having created the clear overlap once again, the Welsh decision-making lets them down and this example underlines the risk involved in having the ball up in the air.
Farrell fails, Farrell finds space
Occasionally, there are going to be interceptions and we see another one below in England’s win over the Italians.
Farrell [blue] is on the ball and has Joseph [red] clearly unmarked and waiting to score on the right touchline.
Benvenuti [yellow] is the only obstacle and Farrell opts for the bridge pass in an attempt to take the overlap.
But Farrell’s pass is too low and Benvenuti reacts well, timing his leap perfectly to catch the ball over his head.
Farrell was picked off by the All Blacks in a similar position when playing for the Lions last summer but, to his credit, he is an excellent passer and he has demonstrated that again during this Six Nations.
It was his bridge pass that gave Joe Launchbury the space to offload wonderfully for May’s second try in England’s win over the Welsh.
After 25 phases of direct, grinding ball-carrying, England need something different to finally unlock Wales’ defence and Farrell has the vision to provide a chance.
Farrell [blue] above is on the ball as first receiver, just two phases after carrying himself, and identified that Josh Adams [yellow] is exposed on the outside edge of the Welsh defence.
Aware that Adams will press up, as indicated by yellow below, Farrell has the vision to throw his pass over the Welsh wing’s head for Launchbury to drift out onto.

Moriarty hammers Farrell in the tackle just after he’s released his pass but the ball floats delightfully over to Launchbury, who then produces a brilliant offload to send May over for his second score.
The risk involved in these bridge passes is evident but nailing this technique is increasingly crucial at the top levels of the game, particularly with defenders on the outside edges now habitually pressing up even when there are overlaps in attack.
The42 is on Instagram! Tap the button below on your phone to follow us!
